Even experienced experts encounter the challenge of planning partitions during system installation. Assessing the required space for "/home" to accommodate numerous accounts years in the future is a complex task. The process of resizing hard drive partitions using tools like fdisk or parted is a daunting endeavor for system administrators. Although there are commercial software options available for dynamically adjusting partition sizes without data loss, these operations necessitate halting the running of Linux. This poses a considerable challenge for servers that must maintain uninterrupted operation 24/7..
Developed in 1989, the Logical Volume Manager (LVM) offers an effective solution for changing the size of filesystems while a Linux system continues to run, addressing the limitations of traditional fixed-size partitions.
Here are some of the benefits of LVM:
Flexibility and Dynamic Adjustment: LVM allows you to create virtual logical volumes (LVs) that can span multiple physical disks or disk partitions. This provides greater flexibility, enabling you to adjust the size of volumes on-the-fly without shutting down the system or affecting running applications.
Data Migration and Mobility: LVM enables data migration without disrupting services. You can move data between physical disks or from one logical volume to another without interrupting operations. This is useful for upgrading disks or reorganizing storage configurations.
Snapshots and Backups: LVM offers snapshot functionality, allowing you to create point-in-time snapshots of disk volumes without interrupting system operations. This is beneficial for backups and data recovery, as you can perform operations on the snapshot while keeping the original data intact.
Fault Tolerance and Redundancy: LVM supports mirroring mode, allowing you to create redundant copies across multiple physical disks, enhancing data fault tolerance. In case of a disk failure, data remains accessible.
Efficient Capacity Management: LVM abstracts the capacity of physical disks, enabling more efficient management and allocation of available space.
Real-time Expansion: You can instantly expand the size of logical volumes without the need for disk re-partitioning or service interruption.
Multiple File Systems: LVM enables the creation of multiple logical volumes on the same set of physical disks, each supporting different file systems to meet varied requirements.
In summary, LVM provides a more flexible, efficient, and manageable disk storage solution, particularly for scenarios requiring dynamic capac
LVM Principles
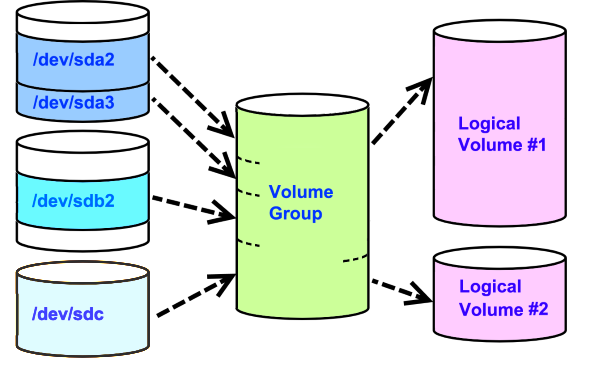
LVM enables dynamic partition resizing through the use of "Storage Virtualization" technology. Furthermore, LVM goes a step further by combining multiple partitions or hard drives into a larger virtual entity known as a "Volume Group" (VG), as illustrated in the diagram below.
In the example VG shown in the diagram, it resembles a virtual large hard drive created from physical hard drives ("Physical Volumes") such as "/dev/sda2", "/dev/sda3", "/dev/sdb2", and an entire hard drive "/dev/sdc". This Volume Group (VG) can have partitions or hard drives added or removed to achieve scalability.
The virtual large hard drive, VG, is then subdivided into virtual partitions known as "Logical Volumes" (LVs). Since LVs are also virtual partitions, they can also be resized.
Understanding the principles of LVM, let's delve into some terminology commonly used in LVM:
Physical Volume (PV)
his refers to a physical hard drive or a partition created on a hard drive. For partitions, the partition ID should be changed to "LVM" to indicate that they can be part of the LVM logical volume setup.
Volume Group (VG)
A Volume Group is formed by combining one or more PVs. It can be thought of as a consolidation of multiple partitions or hard drives into a single virtual large hard drive. For instance, if a user has four 250GB physical hard drives, they can be merged into a 1TB VG, effectively managing it as one large disk.
Physical Extend (PE)
The VG is composed of numerous PEs, which can be likened to blocks in an ext2 file system. PEs are the smallest units in a VG, typically ranging from 4MB to 32MB (or a size specified when creating the VG). All PEs within the same VG must have consistent sizes.
Logical Volume (LV)
LVs are virtual partitions carved out from within a VG.
Logical Extend (LE)
Similar to PE, LE refers to the smallest unit within an LV. Adjusting the size of an LV within a VG essentially involves modifying the quantity of LEs without the need for reformatting, thus preserving data integrity.
Having grasped the principles, the implementation becomes straightforward, following these steps:
Create PV:
Use the pvcreate command to transform an entire hard drive or partition into a PV. For partitions, set the ID to "LVM" before converting to a PV.
Create VG:
Employ vgcreate to combine one or more PVs into a VG.
Create LV:
Finally, use lvcreate to carve out LVs from the VG.
Mounting LVM:
To ensure LVM is mounted on startup, edit "/etc/fstab" or consider relocating directories prone to size changes, such as "/home", to LVM.
Following these operations, the resulting Logical Volumes (LVs), which function like virtual partitions, can be formatted using mkfs and mounted using mount in a manner akin to traditional hard drives.
pvcreate : Creating Physical Volumes
A Physical Volume (PV) is easily created by utilizing the pvcreate command, whether by transforming an entire hard drive or a partition. It's remarkably straightforward! However, if dealing with partitions, it's advisable to set the ID to "lvm". It's important to note that converting a partition to a PV may result in the evaporation of the existing filesystem and data. If actual disks are unavailable for practice, you can utilize virtual storage devices.
For example, let's consider partitioning a new 640GB hard drive, "/dev/sdc", into four partitions and subsequently converting partition #1 through partition #3 into PVs.
Example:
# parted /dev/sdc print←Display partiton info Model: ST964032 2AS (scsi)
Disk /dev/sdc: 640GB
Sector size (logical/physical): 512B/512B
Partition Table: gpt
Number Start End Size File system Name Flags
1 17.4kB 160GB 160GB p1
2 160GB 320GB 160GB p2
3 320GB 480GB 160GB p3
4 480GB 640GB 160GB p4
# parted /dev/sdc set 1 lvm on←Set partition #1 ID to "lvm" (use "8e" with fdisk)
# parted /dev/sdc set 2 lvm on←Set partition #2 ID to "lvm"
# parted /dev/sdc set 3 lvm on←Set partition #3 ID to "lvm"
# pvcreate /dev/sdc1 /dev/sdc2 /dev/sdc3←Convert partition #1~3 into PVs
Physical volume "/dev/sdc1" successfully created
Physical volume "/dev/sdc2" successfully created
Physical volume "/dev/sdc3" successfully created
For converting an entire hard drive to PV:
# parted /dev/sdb mklabel loop←Clear partitions on "/dev/sdb"
# pvcreate /dev/sdb ←Convert the entire "/dev/sdb" to PV
Creating a PV is indeed that simple. You can also use curly braces "{ }" to list differences, for example, pvcreate /dev/sdc{1,2,3} is equivalent to pvcreate /dev/sdc1 /dev/sdc2 /dev/sdc3. Similarly, pvcreate /dev/sd{a,b} is equivalent to pvcreate /dev/sda /dev/sdb.
In the above examples, the parted parameter "mklabel loop" erases partitions and marks the storage device as non-partitionable. This function clears the partition table of the storage device and prevents further partitioning, but allows direct conversion to a PV. In cases where additional physical disks are unavailable but you wish to experiment with LVM, you can create a loop-device using dd and losetup .
Example:
# dd if=/dev/zero of=disk-image bs=1 count=0 seek=100M←Create a 100MB image file
# losetup -fv disk-image←Map the image file to a loop device "/dev/loopN"
loop device is /dev/loop0
# parted /dev/loop0 mklabel loop← Mark "/dev/loop0" as non-partitionable
# pvcreate /dev/loop0← Convert "/dev/loop0" to PV
Physical volume "dev/loop0" successfully created
Other PV-related commands include:
pvremove : Removes a PV,
Removes a PV, e.g., pvremove /dev/hdb3
pvmove : Moves PV data
For instance, pvmove /dev/sda3 moves data from "/dev/sda3" to another available PV. You can specify the target, such as pvmove /dev/sda3 /dev/sdc1 , to move the content to "/dev/sdc1" (within the same VG).
pvscan : Scans for PVs to display existing partitions that have been converted to PVs
pvdisplay : Displays PV information
More detailed than pvscan, pvdislay [PV name] provides comprehensive details for each PV.
pvs : Provides an overview of PV usage and attributes.
offering a concise view in comparison topvdisplay.
The vgcreate command is responsible for combining one or more PVs into a VG. Its usage is similar to pvcreate, but you need to specify a name for the VG. For instance, the following example combines PVs "/dev/sdc1" and "/dev/sdc3" into a VG named "MyVG."
Example:
# vgcreate MyVG /dev/sdc1 /dev/sdc3←Creates VG "MyVG" from PVs "/dev/sdc1" and "/dev/sdc3"
Volume group "VG1" using metadata type lm2
Following these operations, a VG named "MyVG" has been created. You can envision "MyVG" as a large hard drive formed by PVs "/dev/sdc1" and "/dev/sdc3". Next, you can use vgcreate to divide it into LVs.
When creating a VG with vgcreate, the system determines the size of PEs (Physical Extents) based on the VG's size. This size typically ranges from 4MB to 32MB. If you want to specify the size of PEs, you can use the "-s #[KMGT]" option. For example, vgcreate VolGroup -s 8M /dev/sda creates a VG with a PE size of 8MB. However, the PE size must be in the form of 2N (N being a positive integer greater than 10, e.g., 212,=4K). Therefore, the minimum PE size is 1KiB, and determining PE size is analogous to determining block size in ext2/ext3.
Other VG-related commands include:
vgremove : Removes a VG.
For example, Pvgremove MyVG removes the entire VG named "MyVG."
vgscan : Scans for VGs to check their availability.
vgdisplay :Displays VG information.
imilar tovgscan, vgdislay[VG Nane] provides detailed information about each VG, including VG size, PE size, total PE count, and more. The relationship between Total PEs, PE size, and VG size is Total PEs × PE size = VG size (in MiB or GiB).
Over time, you might forget which PVs compose a VG. You can use vgdisplay -v to display this information.
vgs : Provides a concise overview of VG attributes.
vgextend : Expands VG capacity.
If you want to increase VG capacity later, use vgextend For example, vgextend MyVG /dev/sdc2 expands PV "/dev/sdc2" into VG "MyVG."
vgreduce : Reduces VG size.
The counterpart of vgextend, vgreduce, removes a PV from a VG. For instance, vgreduce MyVG /dev/sdc2 removes PV "/dev/sdc2" from VG "MyVG."
vgrename : Renames a VG
For instance, vgrename MyVG MyVolGrop renames VG "MyVG" to "MyVolGroup."
vgchange : Modifies VG settings
If a VG becomes inactive for unknown reasons, you can use vgchange [VG_NAME] -ay to activate it. Conversely, vgchange [VG_NAME] -an deactivates the VG (you can observe active/inactive status using lvscan).
lvcreate : Creating Logical Volumes lvcreate is akin to the traditional partitioning tools like fdisk or parted , but it is used for partitioning within a VG. The option "-L" or "--size" specifies the size of the LV (default is in MB). For instance, lvcreate -L 10G MyVG creates a 10GB LV within VG "MyVG." The size of the LV must be a multiple of the PE size, and if it's not evenly divisible, it will be adjusted to the nearest compatible size.
You can also use the option "-l" (lowercase "L") to specify the number of PEs. For example, lvcreate -l 10000 MyVG creates an LV with a size of PE-size × 1000. The total number of PEs and PE sizecan be obtained from vgdisplay. To simplify, you can also use percentages, such as lvcreate -l 40%VG MyVolGrop to allocate 40% of VG "MyVolGroup" for the LV.
By default, LV names are in the form "lvol#," where "#" is a number. If you want to specify a custom LV name, use the "-n" option. For example, lvcreate -L 1000 -n MyLV1 MyVG creates an LV named "MyLV1" with a size of 1GB within VG "MyVG."
Once an LV is created, a corresponding storage device is generated in the "/dev" directory, such as "VG_NAME/LV_NAME" (you can use lvscan -v to see this information). Subsequent operations can treat these storage device names as physical storage devices. You can format and mount them. The actual device file name for an LV is similar to the mapping used by kpartx and is located in "/dev/mapper/" with the format "VG_NAME-LV_NAME."
Here's an example of creating an LV, formatting it, and mounting it:
Example:
# lvcreate -L 2G -n MyLV1 MyVG←Create an LV named "MyLV1" of 2GB within VG "MyVG"
Logical volume "MyLV1" created
# lvscan -v← Scan for LV device names
Finding all logical volumes
ACTIVE '/dev/MyVG/MyLV1' [2.00 GB] inherit
# mkfs -j /dev/MyVG/MyLV1 ←Format the LV
# mount /dev/MyVG/MyLV1 /mnt←Mount the LV
# df -h← Check the mounted filesystem
Filesystem Size Used Avail Use% Mounted on
/dev/mapper/MyVG-MyLV1 2.0G 68M 1.9G 4% /mnt
The greatest advantage of LVM lies in its ability to flexibly adjust the size of the filesystem without disrupting data integrity. It enables seamless capacity expansion, even during online operations, allowing for non-disruptive adjustments without requiring system downtime. The steps involved are as follows:
Increasing LV Size:
To increase the size of an LV, you can use the lvextend command, which is similar to lvcreate. You can use the "-L" or "-l" options to specify the new LV size (refer to the "lvextend" command example).
Shrinking LV Size:
Shrinking an LV involves temporarily unmounting the filesystem and requires some additional steps to ensure data integrity.
Unmount the filesystem on the LV.
Use e2fsck to check the filesystem on the LV.。
Use resize2fs to adjust the filesystem size on the LV.
Use lvreduce to shrink the LV (note that shrinking may not be supported for XFS filesystems).
Remount the filesystem.。
The following example continues from the previous one and demonstrates the process of increasing and decreasing the filesystem capacity of a mounted LV.
Example (Continuation from Previous Example):
# cp -a /etc/*.conf /mnt←Intentionally store some files to observe if they are affected during the size adjustment
# lvextend -L 3G /dev/MyVG/MyLV1←Increase the LV from its original size of 2G to 3G
# df -h←Verify if the filesystem has grown
Filesystem Size Used Avail Use% Mounted on
/dev/mapper/MyVG-MyLV1 2.0G 68M 1.9G 4% /mnt ←Is the size still the same? Although the LV has grown, the filesystem hasn't been adjusted yet
# rezise2fs /dev/MyVG/MyLV1←Adjust the filesystem size
# df -h ←Verify the filesystem size again
/dev/mapper/MyVG-MyLV1 3.0G 68M 2.8G 3% /mnt ←The filesystem has increased in size! (Now 3G) # ls /mnt←heck if the files in the filesystem have been affected
The following example continues from the previous one and demonstrates the process of increasing and decreasing the filesystem capacity of a mounted LV.
Example (Continuation from Previous Example):
# umount /mnt←Unmount the filesystem first
# e2fsck -f /dev/MyVG/MyLV1←Check the integrity of the LV device-mapper
# resize2fs /dev/MyVG/MyLV1 1G← Shrink the filesystem on the LV to 1G
# lvreduce -L 1G /dev/MyVG/MyLV1←Shrink the LV to 1G
WARNING: Reducing active logical volume to 1.00 GB
THIS MAY DESTORY YOUR DATA(filesystem etc.)
Do you really want to reduce MyLV1? [y/n]: y← A warning about potential data loss will be displayed (press <Y> to proceed)
# mount /dev/MyVG/MyLV1 /mnt← Remount the LV
# ls /mnt←Check if the files in the filesystem have been affected
Please note that when reducing an LV's size, it's essential to avoid going below the amount of used space to prevent data loss. It's recommended to perform a backup before attempting to shrink an LV to mitigate any potential risks.
Other commands related to Logical Volumes (LV) in LVM are as follows:
lvremove : Remove LV
To remove an LV, you should provide the complete "/dev/VG_NAME/LV_NAME" path, such as lvremove /dev/mirror_vg/lvol01.
lvscan : Scan LV
Scan for available LVs and display their status.
lvdispla : Display LV Information
Display detailed information about each LV.
lvs : Display LV Information lvs provides a concise display of LV attributes. Its usage can be a bit complex. For example, you can use it to see the current LVM mode (mirror, striped, snapshot, etc.).
Example:
# lvs -o segtype,devices,lv_name
Type Devices LV
striped /dev/sdb2(0),/dev/sdb1(0) lvol0
lvextend : Increase LV Capacity
Extend the capacity of an LV.
lvreduce : Reduce LV
Shrink the capacity of an LV.
lvresize : Resize LV
和 lvextend 和 lvresize 的差別為 lvresize 可增加或縮減容量,雖方便但多了危險性。 lvresize combines the functionalities of lvextend and lvreduce, allowing you to increase or decrease the capacity of an LV. However, it comes with more risks.
lvrename : Rename LV
Rename an LV. Both of the following usage examples are valid:
lvconvert : Convert LV
Used for converting LV modes. Common usage examples include: lvconvert -m1 vg0/lvol1: Convert a Linear volume to a Mirror volume. lvconvert -m0 vg0/lvol1 : Convert a Mirrored logical volume to a Linear volume. lvconvert --mirrorlog core vg0/lvol1 : Change the mirror-log of a mirrored volume from RAM to disk. lvconvert --mirrorlog disk vg0/lvol1 : Change the mirror-log of a mirrored volume from disk to RAM.
Default LV mode is Linear volume. However, LVs can also operate in Stripe volume and Mirror volume, modes, with the additional functionality of Snapshot volume. Each of these modes serves a different purpose, as explained below:
Linear Volume Mode:
The Linear mode is the default mode for LVM. In this mode, space is used sequentially. For example, if a VG consists of "/dev/sdb" and "/dev/sdc", when creating an LV using lvcreate, it might gather Physical Extents (PEs) from "/dev/sdb" and then use /dev/sdc if more space is needed.
Stripe Volume Mode:
In stripe mode, a file is divided into segments and written in parallel to different PVs (Physical Volumes) to increase speed. When reading, the data is also retrieved from different PVs to compose the file. While stripe mode can enhance speed, it comes with the drawback that if one PV becomes damaged, file recovery becomes impossible, thus increasing the risk.
For example, consider a 1GB file divided into 512KB segments. Odd segments are written to PV "/dev/sdb", and even segments are written to PV "/dev/sdc". With two disks working in tandem, their combined speed surpasses that of a single disk. This configuration with two disks is known as stripes = 2. If there are more disks available, you can use higher stripe values like stripes = 3 or stripes = 4 (the stripe count cannot exceed the number of PVs). The size of each segment is determined by the stripe size (stripe-size).
However, it's important to note that improper planning in stripe mode can lead to degraded performance. For instance, if a VG is composed of "/dev/sdb1" and "/dev/sdb3", and a file is accessed with a striped size (stripe-size) to both "/dev/sdb1" and "/dev/sdb3", in reality, data access is still limited to the same disk, causing non-contiguous file storage and significantly slowing down performance. Proper planning involves ensuring that the PVs within the VG are sourced from different physical disks. An appropriate approach would be creating a VG with the command vgcreate vg_striped /dev/sda /dev/sdb.
To specify that an LV works in stripe mode, you use the "-i #" option where # represents the stripe count. For instance, lvcreate -L 20G -i2 vg_striped sets the stripe count to 2. If you wish to set the stripe size, you use the "-I #" option, where # is a number with a unit of K and its value must be a power of 2. For example, lvcreate -L 20G -i3 -I256 vg_striped specifies a stripe size of 256K. If you don't explicitly set the stripe size, the default value is usually 64K.
When PV sizes within a VG are not uniform, with stripes = 2, the maximum LV size that can be created is twice the size of the smallest PV. For instance, if a VG contains two PVs with PE counts of 1000 and 5000, the maximum LV size that can be created is 1000 x PE-size x 2. Similarly, with stripes = 3, the maximum LV size that can be created is three times the size of the smallest PV.
Mirror Volume Mode
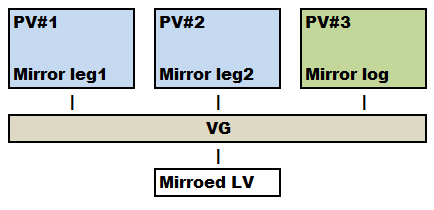
Mirror mode involves two or more PVs replicating each other's data, similar to a mirror, where each replicated copy is referred to as a "mirror-leg."
In the simplest form of mirror mode, with two mirror-legs, two PVs mirror each other. For instance, PV#1 (mirror-leg1) and PV#2 (mirror-leg2) contain identical content, as depicted below. If one mirror-leg becomes faulty, the other mirror-leg retains 100% replicated data. Consequently, although data remains intact, the configuration automatically switches to Linear Volume mode to maintain operation. Mirror volume mode stands in contrast to stripe volume mode, prioritizing safety over speed and capacity.
The option "-m #" (# as a digit) allows specifying the mirror mode when creating an LV using lvcreate. For example, "-m 1" indicates the use of an additional PV for mirroring, resulting in two mirror-legs. Similarly, "-m 2" implies three mirror-legs. For instance, lvcreate -L10G -m 1 vg_mirror generates a two-way mirror mode LV of 10GB. Typically, this requires three PVs, with two PVs mirroring each other, while the third PV records mirror log data. The following diagram illustrates this:
Mirror log (mirror-log) requires less space than the mirror-leg. When creating a 5GB LV with 2 mirror-legs and the VG contains PVs of varying sizes (e.g., 10GB/3GB/7GB), if the desired LV size exceeds the smallest PV (3GB), the system automatically uses the smallest PV (3GB) for the mirror log. The maximum LV capacity that can be created is based on the size of the smallest mirror-leg (7GB). [Note 1.0]
To explicitly specify the PVs for mirror-legs and mirror logs, you can add the PV sequence at the end of the lvcreate command, sequentially designating mirror-leg1, mirror-leg2, and so forth. The final PV is for the mirror log. For instance:
Here, "/dev/sda1" and "/dev/sdb1" serve as mirror-legs, while "/dev/sdc1" functions as the mirror log.
The VG planning for mirror volume also affects reliability. For instance, if a VG is composed of PVs "/dev/sdb1"," /dev/sdb2", and "/dev/sdb3", which originate from the same physical disk, the mirror mode is rendered ineffective if "/dev/sdb" fails. Hence, when utilizing mirror mode, the PVs within the VG should be sourced from different physical disks to enhance redundancy.
Running a mirror volume with only two PVs is possible using the option "--mirrorlog core" to place the mirror log in RAM. However, this comes with the drawback that upon rebooting, substantial time may be required to compare the consistency of mirror-legs.
Example:
# lvcreate -L 3G -m1 --mirrorlog core vg_mirror /dev/sda /dev/sdb←creates a mirrored logical volume using two PVs.
Let's proceed with implementing a mirror volume with 2 mirror-legs, intentionally damaging one mirror-leg, and then recovering from it.
Step 1: Create a Mirror Volume and Mount It
# vgcreate vg_mirr /dev/sdb /dev/sdc{1,2}←Create a Volume Group (VG) with PVs /dev/sdb and /dev/sdc1, /dev/sdc2
# lvcreate -L 1G -m1 -n lv0 vg_mirr /dev/sdb /dev/sdc1 /dev/sdc2←Create a 1GB mirror volume named lv0 in the VG, with /dev/sdb as mirror-leg and /dev/sdc1 as mirror-log
# mkfs /dev/vg_mirr/lv0←Format the mirror volume
# mount /dev/vg_mirr/lv0 /mnt←Mount the mirror volume
# dd if=/dev/zero of=/mnt/file_test1 bs=100M count=1←Write a test file for verification
Step 2: Intentionally Damage One Mirror-Leg。
# dd if=/dev/zero of=/dev/sdb bs=4K count=1000←Damage one mirror-leg (/dev/sdb)
# lvscan←Scan for logical volumes (LVs)
Couldn't find device with uuid 'XuwhhB-585a-20lj-vr0-kGoo-0bmg-cGRv82 ← Output should indicate that the LV is damaged
# echo > /mnt/file_test2←Write a test file to see if it's still readable and how the LV behaves (it should automatically transition to linear volume
Step 3: Recovering from the Damaged Mirror-Leg
# vgreduce --removemissing --force vg_mirr←Remove the missing/damaged PV from the VG forcefully
# vgextend vg_mirr /dev/sdd←Add a new PV (/dev/sdd) to the VG (make sure it's not smaller than the damaged PV) vgextend vg_mirr /dev/sdd
# lvconvert -m1 /dev/vg_mirr/lv0 /dev/sdd /dev/sdc1 /dev/sdc2←Convert the linear volume back to a mirror volume with the new PV and existing mirror-leg (/dev/sdc1) and mirror-log (/dev/sdc2)
# mount /dev/vg_mirr/lv0 /mnt←Re-mount the mirror volume
# ls /mnt←Verify that the previous files are intact
file_test1
file_test2
f a mirrored logical volume fails and the VG's PVs need replacement, you can also try using lvconvert --repair [-f][-y] VG_NAME/LV_NAME for recovery. This interactive command prompts you whether to replace any failed PV. Use the "-y" option to skip the prompt, and the "-f" option to not replace failed PVs.
Snapshot Volume Mode
The LVM provides a useful feature called "snapshot,"[Note 1.0A] which creates an instant copy of a filesystem, commonly used for backup purposes.
While traditional methods like dd, cp, or rsync can be used for backups, snapshots offer a faster alternative. The snapshot functionality is similar to hard links, but it uses metadata to track changes instead of physically copying files, allowing instant backups regardless of filesystem size.
The "-s" option is used with lvcreate to create a snapshot. By default, snapshot LV names are in the format "lvol#," where # is a number. You can also use the "-n" option to specify a custom snapshot LV name. Snapshots must belong to the same VG as the original LV.
For example, lvcreate -L 300M -s -n backup /dev/vg0/lvol2 creates a 300MB snapshot named "backup" of the LV "/dev/vg0/lvol2."
Below is a practical example demonstrating how fast snapshots can be for backups:
Example:
# lvcreate -L 3G -n ori_lv MyVG←Create a 3GB LV named ori_lv in VG MyVG
# mkfs /dev/MyVG/ori_lv←Format the LV
# mkdir /mnt/ori←Create directory "/mnt/ori
# mount /dev/MyVG/ori_lv /mnt/ori←Mount the LV
And then deliberately put some files to "/mnt/ori"
# dd if=/dev/zero of=/mnt/ori/1g-image bs=1 count=0 seek=1G←Generate 1G files
# cp /etc/*.conf /mnt/ori ←Copy some files into it
And then generate a 300M space for maintenance snapshot meta-data, see it The filesystem of 3G cannot be fully copied
# lvcreate -L
300M -s -n snap_backup /dev/MyVG/ori_lv ←Create a 300MB snapshot named snap_backup of the ori_lv LV
# mkdir /mnt/backup←Create directory "/mnt/backup"
# mount /dev/MyVG/snap_backup /mnt/backup ←mount snapshot LV "snap_backup" to "/mnt/backup"
# df -h /mnt/ori /mnt/backup←Compare the filesystem size of the two, it should be exactly the same
Filesystem Size Used Avail Use% Mounted on
/dev/maper/MyVG-ori_lv 3.0G 1.1G 1.8G 5% /mnt/ori
/dev/maper/MyVG-snap_backup 3.0G 1.1G 1.8G 5% /mnt/backup ←300M meta-data space can back up filesystems over 300M (this is 3G)
The above tests reveal that snapshots are truly remarkable backup tools, offering instant backups while occupying minimal space. What's even better is that in LVM 2 (check the LVM version with lvm version), snapshot volumes support both read and write functionality, making them more versatile compared to LVM1's snapshot volumes, which were only capable of read-only backup.
Snapshot volumes capture the state of the file system at the moment of creation. Going forward, the original logical volume (LV) and the snapshot LV are independent of each other, unlike mirrored volumes which are synchronized. This characteristic makes snapshot volumes commonly used for pre-upgrade testing or adjustments. If something goes wrong, there's always the backup data from the snapshot volume. However, activities such as reading, writing, modifying, deleting, or copying files on the snapshot volume or the original LV will gradually consume the maintenance space of the snapshot volume. This consumption is particularly rapid during copying due to the use of "copy on write" (CoW). Therefore, it's essential to regularly monitor and maintain the meta-data space of the snapshot. Once it reaches 100%, the snapshot volume can only be read to ensure data integrity.
Below is an example of usinglvdisplay to monitor the usage of meta-data space in a snapshot:
# lvdisplay /dev/MyVG/snap_backup
--- Logical volume ---
LV Name /dev/MyVG/snap_backup
VG Name MyVG
LV UUID fFbaH4-33Hq-s7a3-e1mo-DPov-4wff-dvuAiI
LV Write Access read/write
LV snapshot status active destination for /dev/MyVG/ori_lv ←Original LV
LV Status available
# open 0
LV Size 3.0 GB
Current LE 768
COW-table size 300.00MB ←Copy On Write Table (meta-data size)
COW-table LE 75
Allocated to snapshot 0.21% ←Meta-data usage, avoid reaching 100% Snapshot chunk size 4.00 KB
Segments 1
Allocation inherit
LVM Migration/Backup
If you need to move a disk with LVM to another host or want to safeguard against accidental data loss during maintenance, you can use vgexport to export the Volume Group (VG) before performing the transfer. Once the disk is moved to the other host, you can use vgimport to import the VG. Before exporting, make sure to unmount any mounted file systems and deactivate the VG using vgchange. When importing, activate the VG and mount the file systems again.
Here is an example of exporting an LVM from the current host:
# umount /mnt ←Unmount the filesystem
# vgchange -an my_vg←Deactivate the VG (make it inactive)
# vgexport my_vg←Export the VG
Volume group "my_vg" successfully exported
After moving the disk to another host, you can import the LVM as shown below:
# vgimport vg_u01 ←Import the VG
Volume group "my_vg" successfully imported
# vgchange -ay my_vg←Activate the VG
# mount /dev/my_vg/lv_0 /mnt←Mount the filesystem
Additionally, if you are concerned about potential configuration damage in LVM (such as VG composition and LV sizes), you can use vgcfgbackup to create a backup and vgcfgrestore to restore it. The "-f" option is used to specify the filename.
Example:
# vgcfgrestor vg01 -f myvg_backup←Backup the metadata of VG "vg01" to the file "myvg_backup"
Volume group "vg01" successfully backed up.
# vgcfgrestore vg01 -f myvg_backup←Restore the metadata of VG "vg01"
Restored volume group vg01