1.0 Hard Disk and File System Directory Structure in Linux
Linux Filesystem
When we read and write a file, we don't need to worry about which sector, track, or cylinder the file is stored on the hard disk. We also don't need to worry about the type of storage media, such as hard disk/USB flash drive/CD-ROM, because the file system handles it for us.
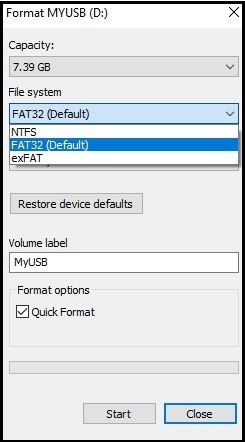
The file system manages how storage media is organized, so different operating systems support different file systems. Each file system has its own advantages and disadvantages. For example, when formatting a USB flash drive in Windows 7/Windows 10, options may include FAT, FAT32, NTFS, exFAT, and others.
If an SD card is formatted with Windows' native "NTFS" file system, some digital cameras or phones may not be able to read it. Formatting it as "FAT" limits single file size to 2GB, while "FAT32" allows files up to 4GB. Filesystems affect the handling capabilities of files, such as copying files from a Linux filesystem to a USB flash drive (usually formatted with FAT32), which may result in the loss of permissions and other information.
Windows can only be installed on the NTFS file system, leaving no other choices, but Linux offers more flexibility and can be installed on native ext2/ext3/ext4 or other contributed file systems like ReiserFS/xfs/Btrfs, among others. Some file systems are better suited for handling large files, while others are more efficient with small files or specifically designed for databases, giving users more choices and, at the same time, more decisions to make.
The file system is an essential element of a PC's operating system. For example, Microsoft's early operating systems mainly provided file system support and were named "Disk Operating System" (DOS). Linux's native file system is ext2 or ext3/ext4.
ext2
ext2 stands for the second extended filesystem and is primarily designed to replace the older ext filesystem. ext2 is the native file system of Linux, and its most notable feature is that it provides files with ownership and permissions (read, write, or execute).
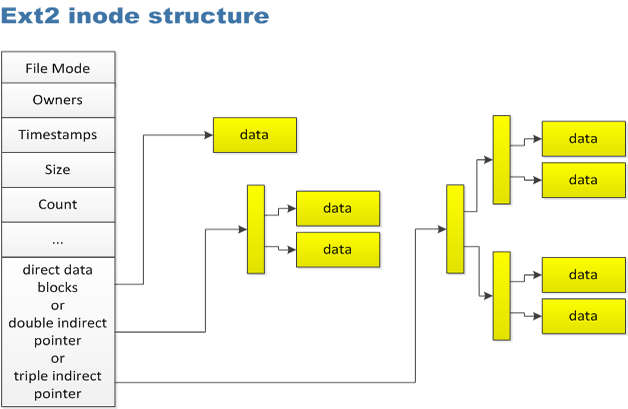
The ext2 file system is composed of two main components: "inodes" and "blocks." Inodes store metadata about files, while blocks contain the actual file content. Their functions are as follows:
inode
A typical ext2 filesystem allocates about 1% of disk space to a group of inodes. Each file requires an inode to record information such as file type, owner, file size, timestamps, the number of hard links, and the location of its blocks. The inode can point directly to blocks (direct data blocks), but if that's not enough, it may also use double indirect pointers or triple indirect pointers, as shown in the diagram .
Since each file needs one inode, a situation may arise where a lot of small files in an ext2 filesystem use up all available inodes, even though there is still free space on the disk. Unfortunately, in such a case, it won't be possible to create any new files. Users can check inode usage by using the df -i command. If "IUse%" shows 100%, it means that the partition has run out of inodes.
block
Blocks are the actual storage locations for file content in the ext2 file system. The size of blocks can be 1k, 2k, 4k, or 8k, and this size is determined during the formatting process and cannot be changed afterward. If a file exceeds the size of a single block, it will use multiple blocks to store its data.
The size of blocks determines the maximum file size that ext2 can handle, as shown in the table below:
However, it's not necessarily better to plan for larger blocks. Larger blocks may lead to wasted disk space because blocks are the smallest units that can be filled. If a block isn't fully utilized, the remaining space will be wasted. For example, if a block is set to 4K but only 1K of data is written, the remaining 3K will be unused.
Furthermore, when formatting advanced format drives, the block size should be set as a multiple of 4k; otherwise, it can severely impact performance.
ext3/ext4
ext3 is an improvement over ext2 and introduces journaling functionality, making it a "journaling file system." The journaling file system principle is that any changes made to a file will be recorded in a journal. In case of a power outage or file corruption during file writing, the file system can use the journal's recorded changes to increase the chances of automatic file repair. ext3 has three levels of journaling, which can be specified during filesystem mounting or at boot time in the etc/fstab file:
Journal::
When a file changes, both its metadata (e.g., inode bitmap, superblock, block bitmap) and its content are written to the journal. This ensures maximum safety but also results in slower performance.
Ordered:
During file modification, only metadata changes are written to the journal, not the file content. This compromises between speed and safety and is the default setting.
Writeback:
The journal only records metadata changes but does not guarantee the order of writing the file and updating the journal. This can lead to inconsistencies between metadata and the journal. Writeback offers the highest speed but carries the most risk.
Currently, mainstream file systems like Windows' NTFS and Linux's ext3/ext4/reiserFS all belong to journaling file systems.
Unix Directory Structure
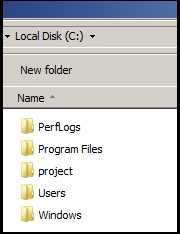
Before explaining the Unix/Linux directory structure, let's compare it with the more familiar Windows. In Windows, when we enter "START C:" in command mode, it opens the Windows File Explorer, and we may see directories like:
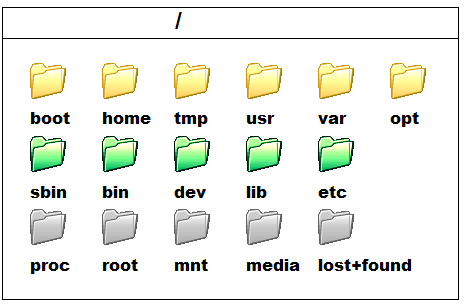
Due to the conditioning from using Windows, I initially had trouble finding "C drive" or "C:" when I started using Linux. The concept of a "local disk (C:)" doesn't exist in Unix/Linux. Instead, Unix/Linux has a "Filesystem Directory Structure" or "Filesystem Hierarchy Standard" (FHS), as shown in the image below:
The Linux FHS can consist of one or multiple hard disks, and it starts at the top-level directory, which is the root directory "/". The directories under the root directory are as follows (colored differently in the image for distinction):
The Linux FHS can consist of one or multiple hard disks, and it starts at the top-level directory, which is the root directory "/". The directories under the root directory are as follows (colored differently in the image for distinction):
Directories that can be on independent partitions:
These include /boot, /home, /tmp, /usr, /var, and /opt (highlighted in yellow in the image). These directories can be stored on separate partitions to distribute risk and facilitate recovery in case a partition or disk becomes damaged. Rebuilding the damaged partition is all that's required, and the rest of the system remains intact.
These directories can be mounted on separate partitions or be created as separate directories under the root directory.
Directories that must be on the same partition as the root directory:
These include /sbin, /bin, /dev, /lib, and /etc (highlighted in green in the image). They store essential files needed during the boot process. These directories and files must be present on the root partition because it's mounted first during the boot process.
Regardless of the Linux distribution, the file system directory structure is generally the same because most distributions follow the "Filesystem Hierarchy Standard" (FHS). The content of FHS can be summarized as follows:
/: Root directory
The top-level directory for the entire Linux file system structure. It is recommended to have only directories and no files directly under the root directory.
Directories that must be on the same partition as the root directory "/":
bin:
Stores essential user command binaries (executables) such as ls,cp,cat, etc.
sbin:
Stores essential binaries and utility software required for the "Single User Mode," which is primarily used by the system administrator (root). Examples of such binaries and utilities include parted, shutdown, and others.
dev:
Contains device files for all devices; in Linux, "everything is a file," including peripheral devices, which are represented as files in this directory.
lib:
Holds essential shared libraries needed for the boot process and for the core functioning of programs.
etc:
Stores configuration files for the system.
Other directories:
lost+found:
Acts as a lost and found directory. If the system crashes or experiences abnormal shutdowns, files that weren't saved might be found here for possible recovery.
proc:
This is a virtual directory that doesn't exist on the hard disk. Instead, it provides information about running processes and system status as files, making it easier for monitoring purposes.
root:
The home directory for the root user (superuser).
mnt:
Used as the temporary mount point for filesystems.
media:
Typically used as the mount point for removable media such as USB flash drives.
Hard Disks and Device Files in Linux
In Linux, device files are special files that represent various devices in the system. They allow user-level programs to interact with hardware devices without needing to know low-level details. Here are some common Linux device files and their brief explanations:
/dev/sda, /dev/sdb, ... (and similar for other letters):
Explanation: These are block device files that represent physical storage devices like hard drives, solid-state drives, or USB drives. The "sd" stands for "SCSI disk," although it covers most modern storage devices.
/dev/null:
Explanation: A special file that discards any data written to it. Useful for discarding output or preventing unwanted data from reaching a process.
/dev/zero:
Explanation: A special file that generates an infinite sequence of null bytes (0x00) when read from. Useful for generating data for testing or filling files with zeros.
/dev/random:
Explanation: A special file that provides pseudo-random data. It uses environmental noise to generate random bytes, suitable for cryptographic purposes.
/dev/urandom:
Explanation: Similar to /dev/random but provides a faster, non-blocking stream of pseudo-random data. Suitable for most general-purpose random data needs.
/dev/tty:
Explanation: A device file representing the controlling terminal. When a process reads from or writes to this file, it interacts with the terminal connected to the process.
/dev/pts/0, /dev/pts/1, ...:
Explanation: These are pseudo-terminal slave device files. Each file represents a terminal session (like a terminal window or SSH session) created by a terminal master.
These are just a few examples of device files in Linux. The /dev directory contains many other device files, each representing a different hardware device or interface in the system.
In the above table, the focus is on item 1 "/dev/sda, /dev/sdb, ..." which represents block device files in Linux. These device files are crucial for later operation examples as they allow interaction with physical storage devices such as hard drives and USB drives. When performing tasks like formatting, partitioning, or managing storage devices in Linux, it is essential to work with the appropriate device file, such as "/dev/sda" or "/dev/sdb." Caution should be exercised while using these device files, as any actions performed on them directly affect the data on the associated storage devices. Always verify the device you are working with to avoid unintended consequences.
1.1 Displaying Hard Disk Information df : Display disk usage
The most straightforward way to understand disk usage in Linux is by using the df command (disk free). df displays the usage of each mountedpartition.
Example:
In the above example, the "Filesystem" column shows two devices, "/dev/sda#" (# being a number) and "/dev/sdb#", indicating the presence of two hard drives. For instance, "dev/sda" has four partitions: "/dev/sda5", "/dev/sda2", and "/dev/sda1", mounted at "/", "/home", and "/boot", respectively.
The "tmpfs" ("/dev/shm") is not a physical disk but rather a type of RAM Disk. It is like a virtual disk in memory and is present in most Linux distributions by default. Data stored in "/dev/shm" operates at RAM speed, making it useful for temporary file operations. However, remember that data in "/dev/shm" is volatile and will be lost upon reboot.
The main options are:
df -h: Displays size units in KB, MB, or GB for better readability.
df -i: Displays the percentage of inode space used.
df -T: Shows the filesystem type of each partition.
df -t ext3 -t vfat: Filters and displays only "ext3" and "vfat" filesystems.
To check the location of a specific file, append the file path to df:
Example:
$ df -T←Displays the filesystem type of each partition
Filesystem
Filesystem Type 1K-blocks Used Available Use% Mounted on
/dev/sda5 ext3 13172924 3876612 8616364 32% /
/dev/sda2 ext3 4956316 154656 4545828 4% /home
/dev/sda1 ext3 194442 12060 172343 7% /boot
tmpfs tmpfs 514304 12 514292 1% /dev/shm
/dev/sdb1 ext2 20635700 44992 19542472 1% /media/DB
/dev/sdc1 vfat 31195120 16 31195104 1% /media/disk
$ df -t ext3 -t vfat ←Displays only "ext2" and "vfat"
Filesystem Type 1K-blocks Used Available Use% Mounted on
/dev/sdb1 ext2 20635700 44992 19542472 1% /media/DB
/dev/sdc1 vfat 31195120 16 31195104 1% /media/disk
When df is followed by a directory or file, it shows the partition on which that file is located.
Example:
$ df -h /bin/bash←Check the location of the file "/bin/bash"
Filesystem Size Used Avail Use% Mounted on
Filesystem Size Used Avail Use% Mounted on
/dev/sda5 3.9G 3.6G 173M 96% /
du : Display directory usage du (disk usage) displays the usage of directories and is similar to the tree command, but it also shows the size of directories.
Example:
$ du /etc ←Displays the size of subdirectories under the directory "/etc"
40 /etc/redhat-lsb
8 /etc/yum/pluginconf.d
24 /etc/yum
du: `/etc/audisp': Permission denied
32 /etc/samba
8 /etc/sysconfig/modules
388 /etc/sysconfig/network-scripts ... (continued)
$ du /etc | sort -n←Sort by directory size
By default, the sizes are displayed in 1024 bytes. The option du -h is used to display sizes in KB, MB, or GB.
Other commonly used options include:
du -a to display the size of each individual file within the directory.
du -s to display only the total size of the specified directory.
Example:
$ du -sh ~/←Displays the total size of the home directory 16M /home/aaa/ 16M /home/aaa/
If you are logged in with a regular user account, some directories or files may not be accessible due to permission issues, which could affect the statistics. Most disk-related commands, except for du and df require superuser (root) privileges to operate.
For more explanations of du operations, please refer to the provided link .
blkid : Display disk information
In Unix/Linux, hard drives and other storage media are referred to as "block devices." Therefore, the blkid tool is used to display block device IDs. (Typically, root privileges are required to execute and display the information correctly, and even filesystems that are not mounted will be shown.)
blkid is a useful tool to gather information about hard drives, and its usage is straightforward, as shown in the following example.
Example:
# blkid←Displays disk information /dev/sda5: LABEL="/" UUID="24328158-f8c3-4c5e-9be0-cbd1ceee581f" SEC_TYPE="ext2" TYPE="ext3"
/dev/sda1: LABEL="/boot" UUID="8ab1dede-36dd-4469-a174-ffb04f9ee6df" SEC_TYPE="ext2" TYPE="ext3" ... (continued)
The main information provided includes the device file, label name, UUID, and filesystem type. The UUID (Universally Unique Identifier) is a unique number generated during formatting, and it can be used for mounting, LVM, or RAID to identify the hard drive or partition. It remains constant even if the Linux kernel is upgraded, BIOS settings are changed, or a different Linux distribution is used.
To display specific information, you can use the "-s" option followed by [LABEL], [UUID], or [TYPE]. For example:
Example:
# blkid -s TYPE ←Displays the filesystem type for each partition /dev/sda5: TYPE="ext3"
/dev/sda1: TYPE="ext3"
/dev/sda2: TYPE="ext3"
/dev/sda3: TYPE="swap"
/dev/sdb1: TYPE="ext3"
/dev/sdc1: TYPE="vfat"
# blkid -s LABEL←Displays the label name for each filesystem (only if labeled)
/dev/sda5: LABEL="/"
/dev/sda1: LABEL="/boot"
/dev/sda2: LABEL="/home"
/dev/sda3: LABEL="SWAP-sda3"
/dev/sdb1: LABEL="data"
/dev/sdc1: LABEL="PEN_FLASH"
# blkid -s UUID←Displays the UUID for each partition
/dev/sda1: UUID="9da5bd9a-300f-42f8-8d32-49af244a4c4f"
/dev/sda2: UUID="374b2969-3c63-438f-8762-3db53f96f409"
/dev/sda3: UUID="a2e9407d-8a07-4d68-8a4a-ebd712280f10"
To customize the output related to devices, you can use the "-o" option followed by [device], [full], or [value]. For example:
Example:
# blkid -o device ← Displays the device files for each device /dev/sda5
/dev/sda1
/dev/sda2
/dev/sda3
/dev/sdb1
/dev/sdc1
1.2 Disk Partitioning
Disk partitioning is the process of dividing a large storage device, like a hard disk, into smaller sections or partitions. This concept is similar to dividing a large house into multiple rooms. By partitioning a hard disk, each partition functions as if it were a separate disk. For example, in Windows/DOS, one physical hard disk can be divided into partitions such as C:/D:/E:, making it appear as if there are multiple separate disks.
The benefits of partitioning a hard disk into multiple partitions include:
Security:
Storing the operating system on one partition and data on another allows for data preservation even if the OS needs to be reinstalled. For instance, in Windows, the OS is typically installed on "Local Disk (C:)" and data can be kept on "Local Disk (D:)."
Convenient management
Each partition can hold different types of data, making it easier to manage and organize files.
Improved speed
Having multiple partitions can improve file search times and overall disk performance, as the system can access data more efficiently.
Installing different operating systems:
Each partition can theoretically host a different operating system.
However, the main drawback of partitioning is that if the physical hard disk fails, all the partitions on that disk may become inaccessible. To mitigate this risk, one can consider distributing data across partitions on separate physical disks.
The concept of disk partitioning is not specific to any particular operating system. Different operating systems may have varied terminology and support different partitioning tables. Two commonly used partitioning tables are the traditional Master Boot Record (MBR) and the newer GUID Partition Table (GPT), both of which are well-supported by Linux.
After partitioning a disk, additional steps are required:
Set the partition ID
This step involves assigning a partition ID to indicate the intended use of the partition and its filesystem. For instance, in Linux, partition ID (HEX) represents a native Linux partition, and ID 82 (HEX) represents a swap partition.
Format the partition
Each partition can only be formatted with one type of filesystem. The chosen filesystem should match the partition ID to avoid compatibility issues. Formatting involves writing appropriate information to the partition, such as inode allocation and block size, in the case of Linux's native filesystem, ext2.
Mount the partition:
Unlike in Windows, where formatting automatically mounts the disk for immediate use, in Unix/Linux, manual mounting may be necessary, depending on the Linux distribution used. Mounting allows the operating system to access and use the partition.
This information was last updated on: Oct 23 2021
Currently, newer versions of operating systems such as Windows 10 and above, or motherboards that no longer support MBR (Master Boot Record), recommend using GPT (GUID Partition Table) for partitioning.
Traditional MBR Disk Partitioning
MBR (Master Boot Record) is the traditional way of disk partitioning and booting for PCs. It has been in use since PC-DOS 2.0 in 1983 and is still widely used today. One of its advantages is that it is supported by almost all PCs. However, MBR has limitations, as it only supports 32-bit LBA addressing, allowing for a maximum disk capacity of approximately 2.19TB (232 x 512 bytes) or less. This limitation was inconceivable at the time of its creation, as hard disks were not expected to exceed 2TB. The MBR method involves the BIOS reading the first 512 bytes of the disk, known as the "Master Boot Record," located at Cylinder 0, Head 0, Sector 1, when the PC boots.
primary partition
The majority of the Master Boot Record is dedicated to the boot program, with 64 bytes reserved for the partition table. Each partition record requires 16 bytes, allowing for a total of 4 partition entries in the MBR, which are called "Primary Partitions."
extended partition
Due to the limitation of MBR supporting only 4 primary partitions, an "Extended Partition" is used to overcome this limitation. The extended partition contains pointers that reference additional logical partitions. In theory (depending on the disk's capacity and disk partitioning software), the extended partition can be further divided into an unlimited number of logical partitions.
logical partition
The extended partition serves as a pointer and cannot be directly used as a partition. It points to an additional partition table that defines logical partitions. These logical partitions are referred to as "Logical Partitions."
Windows generally designates the primary partition on which the OS boots as the "C:" drive, and the other partitions are sequentially assigned drive letters such as "D:" and "E:". However, Linux does not follow the same naming convention for partitions.
Linux Naming Convention for Partitions:
Primary Partitions: The disk device file name is followed by a number, starting from 1 to 4.
Logical Partitions: The disk device file name is followed by a number starting from 5.
For example, if a SATA hard disk is divided into 4 primary partitions, the device names for each partition would be as follows (highlighted in green):
SATA Hard Disk
SATA Hard Disk @port 1
/dev/sda1
/dev/sda2
/dev/sda3
/dev/sda4
SATA Hard Disk @port 2
/dev/sdb1
/dev/sdb2
/dev/sdb3
/dev/sdb4
Once again, it is emphasized that the number part of the Primary Partition must be less than or equal to 4.
For example, let's consider a SATA hard disk at port 1 that is partitioned into 2 Primary Partitions and 1 Extended Partition. The Extended Partition is further divided into 3 Logical Partitions. The device names for each partition would be as follows:
To create more than 4 partitions on a disk, an extended partition is used, and the device names would be as follows (highlighted in green):
Partitioning of the Hard Disk:2 Primary Partitions+3 Logical Partitions
Primary
Partition 1
Primary
Partition 2
Extended
→
Logical
Partition 1
Logical
Partition 2
Logical
Partition 3
/dev/sda1
/dev/sda2
Extended
→
/dev/sda5
/dev/sda6
/dev/sda7
The Extended Partition is used as a pointer and cannot be directly utilized. It needs to be further divided into Logical Partitions to be usable. The numbering for the Logical Partitions starts from 5 onwards.
As shown in the example below using the df command to display disk information, the partition named "/dev/sda5" (which corresponds to the root directory) is a logical partition.
The extended partition cannot be directly used for data storage and must be further divided into logical partitions. Logical partitions are numbered starting from 5.
In summary, regardless of the number of partitions on a hard disk, only primary partitions can be set as the "Active Partition," which is the partition from which the system boots. Logical partitions cannot be set as the active partition.
Using fdisk to partition disks
Partitioning a hard drive using the traditional MBR method is done using the fdisk utility. Since fdisk is an interactive program, it is not complicated to operate and does not require memorizing commands. However, it is essential to understand the background knowledge of primary partitions, extended partitions, and logical partitions, as well as be familiar with the device files used for hard drives in Linux. Making a mistake during the operation could result in data loss.
Ordinary users are not allowed to perform dangerous fdisk operations. Therefore, it is necessary to log in as the Superuser (root) to carry out partitioning. If the physical machine is not accessible, or BIOS information is unavailable, sometimes it is not known how many hard drives are present inside the PC. In such cases, the fdisk -l option can be used to list the hard drive information.
Example: (logged in as root)
# fdisk -l←List hard drive information
Disk /dev/sda: 21.4 GB, 21474836480 bytes ←First hard drive /dev/sda
255 heads, 63 sectors/track, 2610 cylinders
Units = cylinders of 16065 * 512 = 8225280 bytes
Disk identifier: 0x000243c8
Device Boot Start End Blocks Id System
/dev/sda1 * 1 25 200781 83 Linux ←* denotes the boot partition
/dev/sda2 26 662 5116702+ 83 Linux
/dev/sda3 663 789 1020127+ 82 Linux swap / Solaris
/dev/sda4 790 2610 14627182+ 5 Extended
/dev/sda5 790 2610 14627151 83 Linux
Disk /dev/sdb: 21.4 GB, 21474836480 bytes ←Second hard drive /dev/sdb
255 heads, 63 sectors/track, 2610 cylinders
Units = cylinders of 16065 * 512 = 8225280 bytes
Disk identifier: 0x00000000
Disk /dev/sdb doesn't contain a valid partition table ←/dev/sdb is a new, unpartitioned hard drive
The fdisk command can list how many partitions are created on a hard drive. In the example above, the first hard drive "/dev/sda" is divided into five partitions, named "/dev/sda1" to "/dev/sda5". However, fdisk does not provide information about the mounted partitions. To identify the mount points of "/dev/sda1" to "/dev/sda5", one needs to cross-reference with the information provided by the df command.
If a hard drive is new and unpartitioned, like the second hard drive "/dev/sdb" in the example, it does not have any partition numbers (e.g., "/dev/sdb1"). Next, let's demonstrate how to partition this hard drive.
To operate on a specific hard drive, you can add the hard drive device file after the "fdisk" command. If you are unsure about the device file name for your Linux system, whether it is "/dev/sda" or "/dev/hda," you can use either the fdisk -l or ls /dev/[sh]d command to confirm.[Note]
Example: (logged in as root)
# ls /dev/[sh]d* ←List all available hard drives or partitions
/dev/sda /dev/sda1 /dev/sda2 /dev/sda3 /dev/sda4 /dev/sda5 /dev/sdb
In the example provided, the output lists available hard drives and partitions, such as "/dev/sda", "/dev/sda1", "/dev/sda2" and so on. For instance, "/dev/sda" refers to the whole hard drive, while "/dev/sda1", "/dev/sda2" etc., are individual partitions on that hard drive.
The output also includes "/dev/sdb," which has no number appended (e.g., "/dev/sdb1"). This indicates that no partition has been created on this hard drive yet. To partition this hard drive, you can proceed with the following steps:
Example: (logged in as root)
# fdisk /dev/sdb
Device contains neither a valid DOS partition table, nor Sun, SGI or OSF disklabel
Building a new DOS disklabel with disk identifier 0x9939c1b3.
Changes will remain in memory only, until you decide to write them.
After that, of course, the previous content won't be recoverable.
The number of cylinders for this disk is set to 2610.
There is nothing wrong with that, but this is larger than 1024,
and could in certain setups cause problems with:
1) software that runs at boot time (e.g., old versions of LILO)
2) booting and partitioning software from other OSs
(e.g., DOS FDISK, OS/2 FDISK)
Warning: invalid flag 0x0000 of partition table 4 will be corrected by w(rite)
Command (m for help): ←For a list of available commands, press <m>
Operating fdisk can be extremely dangerous, so at any time, you can press 'm' (m for manual) to display a simple explanation of the available commands. During the operation, all changes are only made in RAM, and as long as you don't press 'w' to write the partition table, you can safely press 'q' to quit fdisk. The command explanations after pressing 'm' are as follows:
Example: (Entering fdisk and then pressing 'm') (The operation screen may vary slightly in different versions)
Command (m for help): m
Command action
a toggle a bootable flag
b edit bsd disklabel
c toggle the dos compatibility flag
d delete a partition
l list known partition types
m print this menu
n add a new partition
o create a new empty DOS partition table
p print the partition table
q quit without saving changes
s create a new empty Sun disklabel
t change a partition's system id
u change display/entry units
v verify the partition table
w write table to disk and exit
x extra functionality (experts only)
If you want to clear any existing partitions on the hard drive, you can use 'o' to create an empty DOS partition, which will clear all existing partitions and start anew. Now, let's demonstrate how to create a new Linux partition.
(Fdisk operation)
Command (m for help): n ←Create a new partition
Command action
e extended ←Create an extended partition
p primary partition (1-4) ←Create a primary partition p←Press <p> to create a primary partition
Partition number (1-4): 1←Enter the number for the new primary partition
First cylinder (1-2610, default 1):↵ Enter←Press <Enter> to use the default value for the starting cylinder
Using default value 1
Last cylinder or +size or +sizeM or +sizeK (1-2610, default 2610): +10000M ←Enter the ending cylinder or size for this partition (you can input "+xxxG" or "+xxxM" for size) or press <Enter> to allocate all remaining space.
Command (m for help): p←Display the current partition table to confirm
Disk /dev/sdb: 21.4 GB, 21474836480 bytes
255 heads, 63 sectors/track, 2610 cylinders
Units = cylinders of 16065 * 512 = 8225280 bytes
Disk identifier: 0x378a1ba0
Device Boot Start End Blocks Id System
/dev/sdb1 1 1217 9775521 83 Linux
Command (m for help): w←Write the partition table and exit
The partition table has been altered!
Calling ioctl() to re-read partition table.
Syncing disks.
You have new mail in /var/spool/mail/root
The size of a partition on a hard drive is calculated as the product of the number of cylinders, heads, sectors, and 512 bytes. However, you don't need to calculate it manually while partitioning; let fdisk handle the conversion for you. For example, when you use 'n' to create a new partition, you'll be prompted to enter the starting cylinder. Pressing <Enter> will use the default value, and then you can input "+sizeG" or "+sizeM" to specify the size of the partition, or simply press <Enter> to allocate all the remaining space to this partition.
If you make any changes to the partition, you'll need to restart the system, as Linux kernel loads the partition table only during boot-up. While you can use the partprobe command to force the kernel to update the partition table, it's safer to restart the system after any changes to the partitions.
The example only demonstrates creating one primary partition, but if you're interested, you can experiment with deleting partitions or adding more primary/extended partitions to become more familiar with the process.
During the partitioning process, you can press 'p' to display the current partition table, and if you want to create non-Linux partitions, you can use 't' to change the partition ID. Pressing 'l' (lowercase L) will list all the supported partition types and their IDs.
Modern GPT Disk Partitioning
New GPT (GUID Partition Table) disk partitioning was mainly introduced to overcome the limitations of MBR disk partitioning, which cannot exceed 2.19 TB and only supports up to 4 primary partitions. GPT, on the other hand, supports much larger disk sizes, up to an astronomical 18 exabytes (1 EB = 1024 PB).
Traditional BIOS reads the MBR (Master Boot Record) of the disk during boot-up, and due to the limitations of MBR, partitions cannot exceed 2 TB, which becomes inadequate for modern requirements.
To replace the old BIOS, Intel led the development of a new interface called "EFI" (Extensible Firmware Interface), also known as UEFI (Unified Extensible Firmware Interface). EFI redefines the disk partition table and boot process.
One of the advantages of GPT is that it eliminates the limitations of MBR's maximum four primary partitions. As a result, there is no need for extended partitions and logical partitions. Thus, a single hard drive can have more than four operating systems installed as bootable partitions, and each partition can exceed 2.19 TB in size.
Using parted to partition disks Parted is a disk partitioning tool released by GNU. The name "parted" is a combination of "partition" and "editor," indicating its purpose of editing partitions. parted supports both MBR and GPT partition tables, as well as Apple computers' Mac partition table.
As hard drives continue to grow in size, using GPT for partitioning and adopting advanced formatting for hard drives and SSDs has become an irreversible trend. parted provides more support than fdisk and is recommended to replace the outdated fdisk.
Parted can be used in interactive mode and command-line mode. The interactive mode is more user-friendly and less error-prone, while the command-line mode is faster and suitable for bulk and quick operations.
Interactive Mode:
When you enter parted, it will display the prompt "(parted)" indicating that you are in interactive mode. If you type "help," it will list the available commands.
# parted
GNU Parted 3.1 ← Displays the version
Using /dev/sda← Default disk for operations
Welcome to GNU Parted! Type 'help' to view a list of commands.
(parted) ← Interactive mode prompt
print : Display disk information. "print" command displays the disk partitioning information for the currently selected disk in interactive mode.Interactive Mode - Print Command Example:
(parted) print
Model: ATA ST3320813AS (scsi)
Disk /dev/sda: 320GB
Sector size (logical/physical): 512B/512B
Partition Table: gpt
Number Start End Size Type File system Flags
1 32.3kB 206MB 206MB primary ext3 boot
2 206MB 5445MB 5240MB primary ext3
3 5445MB 6490MB 1045MB primary linux-swap
4 6490MB 21.5GB 15.0GB extended
5 6490MB 21.5GB 15.0GB logical ext3
The "print" command can also take additional parameters to display different information:
devices
Lists all available disks (similar to fdisk -l).
free
Displays the sizes of each partition on the currently selected disk and the remaining free space.
all 或 list
Combination of "print devices" and "print free," displaying all disk devices and their free space
select : Selecting the Disk for Operation
Before entering the parted tool, you can directly specify the device file, such as parted /dev/sdc, to indicate the disk you want to operate on. If you don't specify a device, parted will try to "guess" which disk the user wants to operate on. However, if the user is unsure or if there is a risk of mistaken identification, the "select" command can be used to choose the desired disk for operation.
(parted operation)
(parted) select /dev/sdb← Selecting "/dev/sdb" for operation
using /dev/sdb
mklabel : Choosing the Disk Partition Table
The "mklabel" command is used to create different disk partition tables (e.g., MBR or GPT). The "mklabel" command is followed by the supported partition table types, as listed below:
msdos
Traditional MBR partition table, similar to fdisk's partitioning.
gpt
GPT(GUID Partition Table) disk partition table.
loop A virtual partition table that erases the original partition and prevents further partitioning using "mkpart" (using pvcreate to create LVM or disk group RAID will also show "loop" in the partition table). If you want to clear all partitions on the disk, you can first set it to "loop" and then choose "msdos" or "gpt" to repartition.
mac Apple computer's partition table.
pc98 Japan NEC's pc98 partition table (generally not used, as NEC completely exited the pc98 market in 2003).
sun
Sun (Oracle) Unix-Like "Solaris" OS's disk partition table.
For example, if you want to partition using the traditional MBR partition, you can enter "mklabel msdos." If you want to partition using GPT, you can enter "mklabel gpt."
(parted operation)
(parted) mklabel gpt← Using GPT partition to partition the disk
Warning: The existing disk label on /dev/sdb will be destroyed and all data on
this disk will be lost. Do you want to continue? ← If there are existing partitions on the disk, there will be a warning
Yes/No? ← Press <y> to confirm, <n> to cancel
mkpart : Create a partitionr
To specify the partition table type, use the mklabe command. To create a new partition, use the mkpart command with the following syntax: mkpart [name] [part-type] fs-type start end. Here are the parameters:
name If you are using a GPT partition table, you can specify a partition name. For MBR partitions, this is not necessary.
part-type
For MBR partitions, specify whether it's a primary or extended/logical partition. GPT does not have a limit on primary partitions (up to 4), so there's no need to differentiate between primary and extended partitions.
fs-type
Set the file system ID for the partition. Supported types include:
reiserfs
Previously the default file system for SuSE Linux Enterprise (now changed back to ext3).
btrfs
Developed by Oracle for Linux, aiming to replace ext3.
xfs
Developed by Silicon Graphics in 1993 for its IRIX operating system, a high-performance journaling file system.
start/end
Specify the start and end addresses (sizes) of the partition. The default unit is MB, but you can also input other units like GB or KB, percentages (e.g., 10%), or use the "unit" command to change the unit. Before executing "mkpart," it's recommended to use the "print free" command to check the available disk space.
Below are examples of using "parted" to partition an empty disk:
Example using GPT partition table:
(parted) select /dev/sdb← Select the device "/dev/sdb" (use "print all" to confirm the device if unsure))
Using /dev/sdb
(parted) mklabel gpt←Use GPT partition to partition the disk
(parted) mkpart data1 ext2 0 5000←Create an ext2 partition named "data1" with a size of 5GB
(parted) mkpart data2 ext2 5000 100%←Create another partition with a size of 5GB to use the remaining space
(parted) print free← List the newly created partitions to verify
Model: ATA FUJITSU MHR2020A (scsi)
Disk /dev/sdb: 20.0GB
Sector size (logical/physical): 512B/512B
Partition Table: gpt
Number Start End Size File system Name Flags
1 17.4kB 5000MB 5000MB data1
2 5000MB 20.5GB 15.5GB data2
You can also use "mkpart" without any parameters to interactively prompt for the required information. In this case, "parted" will automatically determine whether it's MBR or GPT and ask for the next actions, making the process more convenient.
set : Set partition flags.
This command is a comprehensive combination of fdisk commands used to set the boot flag and partition ID. The syntax is: set partition-number flag-type [on | off].
Supported flag types for Linux include "boot," "hidden", "raid", "lvm" and more. However, for Linux, the valid flag types are "boot", "raid" and "lvm" used to set the boot partition and LVM / RAID partitions.
(parted operation)
(parted) set 1 boot on← Set partition 1 as the boot partition
Alternatively, you can use the "set" command without any parameters to interactively prompt for the next action.
help : Display operation instructions
In interactive mode, typing "help" will list brief descriptions of each command. Typing "help" followed by the command name will show detailed instructions for that command.
(parted operation)
(parted) help mkpart← View detailed instructions for the "mkpart" command
name : Set partition name
If the "mkpart" command is used without setting a partition name or if you want to change the name, you can use the "name" command to set the partition name. This command only applies to GPT partitions.
(parted operation)
(parted) name 2 "DB data"←Set partition 2 name as "DB data"
rm : Delete a partition
Deleting a partition is a potentially dangerous action. It is recommended to use the "print" command to confirm the partition number before deletion. If a partition is accidentally deleted, you might attempt to recreate it using the "mkpart" command, which may or may not save the data.
(parted operation)
(parted) rm 2←Delete partition 2
unit : Choose the unit of measurement
When using "mkpart" or "print," you can select the unit of measurement. Accepted units are "B" (byte), "KB" to "TB," or "KiB" to "TiB," "compact" (automatically choose the most concise unit), "%" (percentage), "s" (sector), "cyl" (cylinder), and "chs" (cylinder-head-sector).
(parted operation)
(parted) unit GB ← Set the unit to GB
align-check : Alignment check for Advanced Format (AF) partitions
If the parted version is 2.1 or higher, you can check whether the partitions are aligned for advanced formatting of hard disks. The usage is: align-check [optimal | minimal].
(parted operation)
(parted) align-check optimal 1←Check if partition 1 is aligned
1 aligned
quit or q: Exit "parted"
After exiting parted, the changes made using parted will take effect immediately. However, it is recommended to reboot the system to load the new partitions.
In the "command-line mode", if you are familiar with the interactive mode of parted, the command mode will be easy. Simply chain the commands and parameters used in the interactive mode after parted.
For example, to partition an empty hard disk "/dev/sdc" with a GPT table into four equally sized partitions, where partition 3 is a swap partition, and then verify the partitions, you can use the following commands:
partprobe : Reload Partition Table
Since the Linux kernel only loads the disk partition table during boot, if you change the partition using fdisk or parted without rebooting, you can use the partprobe (partition probe)tool to reload the disk partition.
A common option is "-s" to display a summary of partition content.
After partitioning with tools like fdisk or parted, partitions need to be formatted before they can be used properly. The file system used for formatting should match the filesystem type (ID) set for the partition during partitioning. For example, if parted is used to set the filesystem type to ext2, the partition can be formatted as ext2, ext3, or ext4, but not as FAT32 or any other file system, as compatibility issues may arise.
The reason for formatting partitions with ext2/ext3/ext4 file systems is that formatting involves allocating inodes and specifying block sizes. If there were data in the original filesystem, it will be erased after formatting. Therefore, caution should be exercised during formatting, and only the superuser (root) can perform this operation. The commonly used formatting tool in Linux is mkfs.
mkfs : Format the filesystem mkfs is a front-end program, meaning it acts as a shell to provide a consistent interface for formatting different file systems. For example, using mkfs -t vfat will format the file system as FAT32. In reality, it executes the program mkfs.vfat. Similarly, mkfs -t ext2 executes mkfs.ext2. If you're unsure which file systems your system supports for formatting, you can use the command ls /sbin/mkfs.* to check.
Please note that you cannot format a partition that is already mounted.
Example:
# ls /sbin/mkfs.*←heck which file systems are supported for formatting
/sbin/mkfs.btrfs /sbin/mkfs.ext3 /sbin/mkfs.minix /sbin/mkfs.xfs
/sbin/mkfs.cramfs /sbin/mkfs.ext4 /sbin/mkfs.msdos
/sbin/mkfs.ext2 /sbin/mkfs.fat /sbin/mkfs.vfat /sbin/mkfs.exfat
The mkfs command can format a wide range of mainstream file systems. Here is the general usage of the mkfs command:
Syntax: mkfs [-otpiton] [fs][-option] device
Command name/function/command user
Options
Function
mkfs/
format filesystem/
root
-t
Specifies the formatted file system, commonly used as follows:
ext2, ext3 or ext4: Linux native file system.
ntfs: Windows NT, the file system above XP.
vfat: Supports FAT with long file names (FAT32).
exfat: exFAT
xfs: a log-type high-efficiency file system
msdos: only supports FAT with 8.3 file names.
-b
Specifies the block size (not applicable to vfat/msdos/ntfs).
-L
Set the partition label (not applicable for vfat/msdos/ntfs).
fs
The options that can be connected after "fs" are as follows:
-c: Check to see if there is any bad track and then format.
-l: (lowercase L) read the file output by badblocks .
-v: Display the formatting process
Example:
# mkfs /dev/sdb1←If no options are specified, the default formatting filesystem is ext2
# mkfs -t ext4 /dev/sdb←Format as ext4
# mkfs -t ext3 -b 2048 -L DB /dev/sdb2←Format as ext3 with a block size of 2048, and label it as "DB"
# mkfs fs -c /dev/sdb1←Check for bad blocks before formatting
# mkfs -t vfat /dev/sdc1←Format as FAT32
# mkfd -t msdos /dev/fd0←Format the floppy disk as msdos
tune2fs : Adjust ext filesystem settings
When files are damaged, upgrading to ext3 from ext2 is recommended because ext3 offers better chances of recovery. You can seamlessly and safely upgrade from ext2 to ext3 using tune2fs -j.
This information was last updated on : Aug 15 2020 tune2fsversions 1.41.0 and above support upgrading from ext3 to ext4. . [Note 1.3]
Example:
# tune2fs -j /dev/sdb1←Upgrades /dev/sdb1 from ext2 to ext3
tune2fs can be used not only for filesystem upgrades but also to configure how often to check ext2/ext3/ext4 filesystems. There are two ways to check: using tune2fs -c to set the number of mounts before an automatic check, and using tune2fs -i to set the time interval for checks. Below are the detailed options and usage:
Syntax: tune2fs [-otpiton] device
Command name/function/command user
Options
Function
tune2fs/
tune to filesystem/
root
-l: (lowercase L)
Lists filesystem superblock and other information.
-c #
Sets the number of mounts before an automatic filesystem check (# is a number; set to 0 or -l to disable).
-i#[dmw]
Sets the time interval for automatic filesystem checks (# is a number; set to 0 or -l to disable; d for days, m for months, w for weeks).
-m #
Reserves a percentage of blocks for the system (# is a number; the default is usually 5%).
-r #
Sets the number of reserved blocks (# is a number).
e2label : Set the label of a filesystem
To easily identify a filesystem (usually associated with a single partition), you can assign a label name to it. For ext2/ext3 or ext4 filesystems, you can use e2label to set a label name. The syntax is: e2label device [label_name]. The label name cannot exceed 16 characters. If you omit the label name, the existing label will be displayed.
Example:
# e2label /dev/sdc1 ← Display the current label
lab_data
# e2label /dev/sdc1 "hello world" ← Set the label of /dev/sdc1 to "hello world"
For FAT filesystems, the commands to set the label are dosfslabel or mlabel -i.
For more information on e2label operations and examples, please refer to the provided link .
fsck : Check and attempt to repair the filesystem
The command fsck is used to check and attempt to repair file systems. It is executed when the system experiences sudden power loss, software crashes, or forced reboots due to unclean shutdowns. When the file system is not properly unmounted before a reboot, the system automatically runs the fsck command.
fsck is a front-end program similar to mkfs and performs file system checks and repairs specific to different file systems like ext2, ext3, ext4, vfat, or e2fsck. You can check the supported file systems by running the command ls /sbin/fsck.*.
During startup, the system may automatically run fsck based on mount counts or mount intervals to determine whether file system checks and repairs are needed. This information can be displayed using the tune2fs -l DEVICE command.
It's important to note that running fsck on a mounted file system can result in data corruption. Therefore, it's essential to unmount the file system before using fsck for checking and repair.
You can specify the file system to be checked by using either the device file (e.g., fsck /dev/sda2) or the mount point (e.g., fsck /home).
For automatic checks on partitions listed in "/etc/fstab", you can use fsck -A. The "-AR" option is similar to "-A" but excludes the root directory, often used to check all partitions except the root directory.
To illustrate further, here are some examples:
# umount /home
# fsck /home
Running "fsck" on partitions listed in "/etc/fstab":
# init 1
# umount -a
# fsck -AR
Other options:
fsck -a: Automatically repairs errors.
fsck -f: Forces repair even if no issues are found.
fsck -y: Answers "yes" to repair prompts.
fsck -n: Answers "no" to repair prompts.
UNIX directory structure observation reveals that crucial directories like "/bin" and "/dev" are on the same partition as the root "/", making it impossible to unmount the root directory. To address this, the highest priority for checking is assigned to the root partition in "/etc/fstab". If needed, a forced fsck check can be triggered using shutdown -rF now.
Please note that these commands and instructions are based on Linux file system maintenance.
When working with Windows, connecting recognized filesystems like hard drives, CDs, floppies, or USB flash drives automatically results in their immediate "mounting," making them readily accessible. This behavior seems natural and expected. However, in the UNIX world, the process is quite different. Adding new storage media requires system administrator intervention to "mount" them before they can be accessed. (If authorized, regular users can also perform mount and umount operations by setting the "user" option in the "/etc/fstab" file.)
In modern Linux distributions, such as Fedora or CentOS, the approach to mounting storage media falls between that of Windows and UNIX. For instance, when running graphical interfaces (e.g., GNOME desktop environment), recognized filesystems on CD-ROMs, USB flash drives, or hard drives are automatically mounted. However, if you log in through a text interface, the UNIX tradition of not automatically mounting new filesystems is retained.
While automated mounting of storage media offers convenience, it also poses security risks. For example, if sensitive data is on a disk and it's automatically mounted, anyone can access its contents, undermining security. As a result, many Linux servers are configured to boot and operate in runlevel 3 (init = 3), a text-based mode. In this mode, filesystems need to be manually "mounted" by a system administrator before their contents can be accessed.
Due to the interference caused by the "gnome-volume-manager," which automatically mounts new storage media in the Fedora/CentOS GNOME desktop environment, the subsequent explanations and operations will revert to a more basic text-based approach. To achieve this, edit the "/etc/inittab" file and locate the line "id:5:initdefault:". Change it to "id:3:initdefault:" and then restart. This change ensures the system logs in to runlevel 3, the text-based interface, on reboot. This approach aims to closely replicate the original UNIX operations.
(Note: This information was last updated on June 17, 2019.)
In newer versions of Fedora/CentOS (like CentOS 7 or later), the concept of "target" is introduced to replace the use of the configuration file "/etc/inittab" for setting the runlevel during boot. Different boot modes (targets) can be configured using systemctl.
Example: (For CentOS 7/CentOS 8)
# systemctl set-default graphical.target ← Set graphical mode boot (default runlevel = 5)
# systemctl set-default multi-user.target← Set text-based boot (runlevel = 3, requires a reboot)
#
# systemctl get-default ← View the current default mode
# systemctl list-units --type=target← View available targets
When mounting a filesystem, you need to specify a directory as the mount point. Once successfully mounted, any pre-existing data in the directory becomes temporarily hidden to display the contents of the mounted filesystem. This behavior remains until the filesystem is unmounted, at which point the original data becomes visible again. Traditionally, the "/mnt" directory is used as a temporary mount point, while "/media" is used for removable media mount points. 。
Basic usage of mount
The basic syntax for mounting is mount [-t FS_TYPE] [DEVICE] [DIR]. If used without options and additional parameters, simply typing mount will display the current mounting status.
Example:
# mount← Display the current mounting status
/dev/sda2 on / type ext3 (rw)
/dev/sda3 on /home type ext3 (rw)
/dev/sda1 on /boot type ext3 (rw)
The "-t" option specifies the filesystem type("FS_TYPE") to mount (ext2, vfat, auto, etc.). The "DEVICE" refers to the device file or UUID/PARTUUID or label of the partition to be mounted, while "DIR" is the path of the mount point.
For instance, to mount the filesystem on the partition "/dev/sdb1" from a hard drive, you first need a mount point. In the following example, we create a mount point at /mnt/db to mount the filesystem from "/dev/sdb1".
Example:
# mkdir -p /mnt/db←Create a directory `/mnt/db` as the mount point
# echo > /mnt/db/test_file←Create a file `test_file` in the mount point directory (used for testing if the contents are temporarily hidden after mounting)
# mount -t ext2 /dev/sdb1 /mnt/db← Mount the filesystem from `/dev/sdb1` to the mount point `/mnt/db`
# ls /mnt/db/test_file←Test if the newly created file `test_file` is present after mounting the filesystem
ls: cannot acces/mnt/db/testfile: No such file or directory ←The file is temporarily hidden within the directory when mounted
# chmod o+rwx /mnt/db←Change the permissions of the mount point directory to allow others to read and write to this filesystem
In this example, successful mounting results in accessing the directory "/mnt/db", which effectively accesses the filesystem on "/dev/sdb1". Consequently, the original files within the directory become temporarily invisible. To verify the mounting status, you can enter mount or df to display the status of various filesystems.
For ext2/ext3/ext4/Btrfs or xfs filesystems, after mounting, other users may be unable to write to the filesystem. This is because, regardless of the original mount point owner, the owner is changed to the person performing the mount (e.g., the owner becomes root when mounted by the root user). To allow others to write to the newly mounted filesystem, you can use chmod after mounting (as shown in the last step of the example). This change must be performed after mounting, as the mount operation adjusts the mount point's permissions based on umask.
If the "-t" option is omitted, mount will attempt to mount using various "FS_TYPE" values listed in "/etc/filesystems". However, this approach can sometimes result in misjudgments. It is best used when unsure of the filesystem type on a USB flash drive/CD-ROM or floppy, or when the "FS_TYPE" is specified in the third column of "/etc/fstab".
Omitting the "DEVICE" can only be done when the first column of "/etc/fstab" already contains the" DEVICE", or when remounting (e.g., mount -o remount,rw /home).
For example, when "/etc/fstab" lists the "DEVICE" as "/dev/sdc2" and the mounted filesystem is "ext3", you can mount the partition with only the mount point specified.
Example:
# cat /etc/fstab←List the contents of `/etc/fstab`
/dev/sdc2
/mnt/pub
ext3
noauto,user
↑
↑
The first column lists the `DEVICE` as `/dev/sdc2`
The third column lists the filesystem as `ext3`
#
# mount /mnt/pub←Mount the partition listed in `/etc/fstab` with only the mount point specified
The "-o" option allows additional control over the mounting settings. The parameters that "-o" accepts can be referenced from the fourth column of "/etc/fstab" as mount options (e.g., mount -o noatime /dev/sda1 /media mounts the filesystem without updating access times).
Examples:
# mount -t ext2 -o ro /dev/sdc1 /mnt/web←Mount the filesystem as read-only
# mount -t ext3 -o data=journal /dev/sda2 /home←Specify the journaling level for ext3 as `journal`
If mounting settings change, there is no need to unmount and remount. The "-o remount" option allows for remounting. For example, if the initial mounted filesystem is read-only and you want to remount it as read-write, you can use the example mount -o remount,rw /mnt/web (in this case, the "DEVICE" can be omitted).
/etc/mtab Mounting Status
Any mounting, unmounting, or remounting operation updates the mounting status in "/etc/mtab". While this file is similar to "/etc/fstab"," /etc/mtab" is dynamically generated. Observing this file provides insight into the current mounting status. In essence, running mount to view the mounting status is based on "/etc/mtab".If "/etc" is mounted in read-only mode (for instance, during single-user mode operation using init 1 to prevent accidental file deletion), the inability to update /etc/mtab may result in mounting or unmounting failure. In such cases, the -n option can be used to mount without updating "/etc/mtab". For example, mount -t ext3 -n /dev/sda1 /mnt/pub will mount without updating "/etc/mtab". As a result, the mounting status will not be displayed when using mount or df, even though the mount operation was successful.
Many tools heavily rely on "/etc/mtab" to determine mounting status, such as for file capacity quotas.
Label Mounting
The "-L" option is used for label-based mounting. For example,mount -L backup /mnt/db will search for all filesystems with the label name "backup" and mount them to the "/mnt/db" mount point.
UUID/PARTUUID Mounting
In cases where label names may collide, the UUID/PARTUUID displayed by blkid can be used for mounting. The "-U "or "UUID"= option is used for UUID-based mounting, while the "PARTUUID"= option is used for PARTUUID-based mounting.
Examples:
# mount UUID=24328158-f8c3-4c5e-9be0-cbd1ceee581f /media/vol1←Mount using UUID
# mount -U 24328158-f8c3-4c5e-9be0-cbd1ceee581f /media/vol1←Mount using UUID (same as above)
# mount PARTUUID=dad0c110-0a71-4e46-935a-304969ea36ae /media/vol3←Mount using PARTUUID
Mounting USB Flash Drives
Mounting a USB flash drive is similar to mounting a hard drive. If you're not sure about the device file, you can use commands like blkid -o device, parted -l , or ls /dev/[hs]d* to determine it. For floppy disks, the device file is usually "/dev/fd0" or a symlink like "/dev/floppy".
Example:
# mount -t vfat /dev/sdc1 /media/flash←Mount a USB flash drive (FAT filesystem)
# mount -t exfat /dev/sdd /media/flash←Mount a USB flash drive (exFAT filesystem)
# mount /dev/floppy /media/floppy1←Mount a floppy disk
However, note that for FAT filesystems, the chmod command doesn't work due to the lack of inode information. You can use the "-o" umask option to change permissions.
Example:
#
mount -t vfat -o umask=0 /dev/sdc1 /media/flash ←Mount a USB flash drive with full access for all users (FAT filesystem)
Mounting a CD-ROM
To mount a CD-ROM or DVD-ROM, you need to have a disc inserted. Music CDs cannot be mounted as they don't have a filesystem. The filesystem for CD/DVD drives is often" iso9660" or "udf".
Most Linux distributions generate a device file "/etc/cdrom" or similar when a CD-ROM drive is detected. You can use this device file to mount CDs.
Example:
# ls -l /dev/cdrom←Check the CD-ROM device file
# mount /dev/sr0 /media/cdrom←Mount a CD-ROM using the actual device file
# mount /dev/cdrom /media/cdrom←Mount a CD-ROM using the symlink /etc/cdrom
# mount -t iso9660,udf /dev/cdrom /media/cdrom← Mount a CD-ROM with possible filesystems (iso9660 and udf)
If you have multiple CD-ROM drives, you can try using "/etc/sr0", "/etc/sr1", and so on for mounting.
Configuring Automatic Mounting at Boot using /etc/fstab
To automatically mount filesystems at system startup, you can configure the "/etc/fstab" file. This file contains information about filesystems that need to be mounted at boot time. You can also use the mount -a command to remount filesystems listed in "/etc/fstab" after making changes to the file.
Here is an example of an "/etc/fstab" file:
# cat /etc/fstab
LABEL=/
/
ext3
defaults
1
1
# Mount by label
UUID=7f382385-308c-4684-a8d3-651ae16836f4
/home
ext3
defaults
1
2
# Mount by UUID
LABEL=/boot
/boot
ext3
defaults
1
2
tmpfs
/dev/shm
tmpfs
defaults
0
0
devpts
/dev/pts
devpts
gid=5,mode=620
0
0
sysfs
/sys
sysfs
defaults
0
0
proc
/proc
proc
defaults
0
0
LABEL=SWAP-sda3
swap
swap
defaults
0
0
LABEL=data
/mnt/doc
ext3
noauto,user
0
0
/dev/sdc1
/media/usb
auto
noauto,user,umask=0
0
0
# Mount by device name
1
2
3
4
5
6
←Number of fields
device or
label or UUID name
mount point
fs-type
options
dump
pass
← meaning
Each line in the "/etc/fstab" file has six fields:
Device or label or UUID:
Specifies the device, label, or UUID of the filesystem to be mounted.
Mount point:
Specifies the directory where the filesystem should be mounted.
Filesystem type:
Specifies the type of the filesystem.
Mount options
Defines the options for mounting. Various options like auto, noauto, rw, ro, user, etc., can be specified here.
auto/noauto:
This option indicates that the filesystem should be mounted automatically at boot time or when the mount -a command is issued. It's the default behavior if no options are specified.
"auto" is the default option, which automatically mounts the filesystem during boot or when mount -a is executed.
"noauto" prevents automatic mounting.
dev/nodev:
"dev" allows reading device files within the mounted filesystem (e.g., "/dev/cdrom").
"nodev" restricts reading device files.
exec / noexec:
"exec" (default) permits executing binary files within the filesystem.
"noexec" prevents execution of binary files. Useful for security or partitions like "/var" where no execution is needed.rw/ro:
rw /ro:
"rw" allows both reading and writing.
"ro" allows only reading, no writing.
async/sync:
"async" (default) writes data to RAM first, then to the disk, improving speed but risking data loss on power failure.
"sync" writes data directly to the disk, ensuring data integrity but with slower performance.
suid/nosuid:
Controls whether suid permission is allowed within the filesystem.
"user" allows any user to mount/umount.
"user" allows any user to mount/umount.
"users" allows only unmounting for users.
"nouser" restricts mount/umount to the root user.
defaults:
Common options for ext3/ext4 filesystems, equivalent to "rw,suid,dev,exec,auto,nouser,async".
data=journal /ordered//writeback
Applicable to ext3/ext4 filesystems, specifying journaling level.
Dump:
Dump Strength: Ranges from 0 to 2. 0 indicates skipping dump backup.
pass :
Priority of fsck filesystem check during boot, ranging from 0 to 2. 0 skips the check, 1 is highest priority (usually for root), and 2 for other partitions.
Using the command ls -l /bin/mount, you can observe that the mount utility possesses the special suidspecial permissions, indicating that non-root users can also utilize the mount command. But how can they use it? For regular users to operate the mount command, relevant information needs to be written into the "/etc/fstab" file.
For instance, in the author's "/etc/fstab" file, the mounting options (options) in the second-to-last line are as follows:
# cat /etc/fstab | tail -n2 | head -n1←lists the second-to-last line of the "/etc/fstab" file
LABEL=data
/mnt/doc
ext3
noauto,user
0
0
↑
← Not automatically mounted at boot (noauto) & allowed for any user to mount (user)
The use of the "noauto" option ensures that the filesystem won't be automatically mounted during system startup, contributing to enhanced security. With the "user" option in place, regular users are empowered to manually mount the filesystem labeled as "data" (as indicated by "LABEL=data") whenever they require read and write access.
When the content is recorded in the "/etc/fstab" file, you can mount it simply by entering the mount point. Here is an example of mounting the filesystem as a regular user:
Example (Tested with a regular user login):
$ mount /mnt/doc
In the last line of the "/etc/fstab" file, the device "/dev/sdc1" refers to a USB flash drive. If you want to allow non-root users to use a USB hard drive, you can also record it in the "/etc/fstab" file, as shown below:
# tail -n1 /etc/fstab←Display the last line of "/etc/fstab"
/dev/sdc1
/media/usb
auto
noauto,user,umask=0
0
0
↑
↑
When unsure about the filesystem of the USB flash drive, set it to auto
To allow general users to read/write the FAT filesystem of the USB flash drive, set umask=0
Following the same principle, if you want to allow non-root users to mount a CD-ROM or floppy disk, you can use the "auto" filesystem type (since the inserted media's filesystem might vary). However, remember that you need to insert the CD-ROM or floppy disk before you can mount it. The device file for CD-ROM is usually "/dev/cdrom," and for floppy disk, it's "/dev/floppy" (although floppy disks might not be commonly used nowadays).
umount : Unmounting filesystems
和 mount 掛載反向動作指令為 umount (卸載),umount 用法相對簡單語法為 umount DEVICE 或 umount DIR 。其中DEVICE 為設備檔案, DIR 為掛載點。
The reverse operation of mounting is unmounting, and the command for unmounting is umount, The usage of umount is relatively straightforward: umount DEVICE or umount DIR . Here, "DEVICE" refers to the device file, and "DIR" refers to the mount point.
Example:
# umount /mnt/doc←Unmount using the mount point (recommended)
# umount /dev/sdc1←Unmount using the device file (not recommended, as it might mistakenly unmount a different filesystem when using UUID or label to mount)
For devices like CDs, USB flash drives, or floppies, it's necessary to unmount them before removing. If a filesystem is currently in use, the unmount operation will not proceed. In such cases, umount -l can be used, which will wait until no one is using the filesystem before unmounting. On the other hand, umount -f is a forceful unmount and is recommended only for NFS (Network File System) to allow administrators to forcibly disconnect.
Furthermore, umount -a unmounts all filesystems according to the mount settings specified in "/etc/fstab."
Mounting Virtual Device
Traditionally, a partition could only be formatted with one type of filesystem. However, with virtual storage techniques, it's possible to mount another filesystem within an existing filesystem. This is commonly used to mount CDs or floppies.
To mount virtual devices, the "-o loop" option is used.
Example:
# mount -t iso9660 -o loop ~/Fedora-DVD.iso /media/cdrom/←Mount an ISO image of a CD
# mount -o loop floppy1.img /media/floppy/←Mount an image of a floppy disk
Virtual storage techniques aren't limited to mounting CDs or floppies; they can also be used to mount an image file of a specific partition on a hard disk.
[Note]
The traditional IDE hard disk device files were named as "/dev/hd[a~d]", but starting from Linux Kernel version 2.6.19, the device naming for both IDE (PATA) and SATA hard disks was unified, and they are now uniformly named as "/dev/sd[a~p]".
[Note 1.3]
You can upgrade an ext3 file system to ext4. Ext4 is backward compatible with ext3, meaning you can mount an ext3 file system as ext4 without any data loss or changes to the file system itself. However, to fully utilize the features of ext4, you should perform a filesystem conversion or upgrade from ext3 to ext4.
To perform the upgrade, follow these steps:
Backup your data: Before making any changes, it is always recommended to back up your data to prevent accidental data loss.
Unmount the ext3 file system: Make sure the ext3 file system is not mounted. You can use the umount command to unmount it if it's currently mounted.
Check the file system: Before upgrading, you should run a file system check on the ext3 file system to ensure there are no errors. You can use the e2fsck command for this:
e2fsck -f /dev/your_ext3_partition
Convert to ext4: Now, convert the ext3 file system to ext4 using the tune2fs command:
Update the file system: Run the fsck command to update the file system's metadata to ext4:
fsck -pf /dev/your_ext3_partition
Mount the ext4 file system: After the conversion, you can mount the updated ext4 file system:
mount /dev/your_ext3_partition /mount_point
Once the conversion is complete, your ext3 file system will be using the ext4 features, such as extents and directory indexing. However, it's essential to note that converting from ext3 to ext4 does not reclaim the space used by the old inode table. If you want to make the most of the ext4 file system, it is recommended to create a new file system from scratch (after backing up your data) rather than converting from ext3.