No software has ever been as extreme as UNIX/Linux's vi (pronounced vee eye) text editor, haters say vi has a "very nasty interface", "newbie-killing". Despite being heavily criticized, there are still many supporters and fans of this controversial tool, which is quite peculiar.
UNUX/Linux users use very nasty interface vi almost several times more than other more intuitive and friendly editors (such as Emacs or pico, jed, nano). At the same time, vi is also the favorite editor used by hackers. It is widely rumored that you can know the "level" of a person just by looking at the editor he uses.
Although Unix/Linux has many user-friendly editors, not every Linux distribution or Unix system includes them. The only universally recognized "official" editor for Linux/Unix that is always included is vi. Additionally, many commands such as visudo, vipw, vigr, and edquota default to opening files with vi.
To understand why vi is considered "cruel" for beginners, we need to trace the history of vi. Vi was first developed in 1976 by Bill Joy, a legendary figure in Silicon Valley. It was later released with BSD in 1978. Prior to vi, computer editing was done one line at a time using "line editors" such as le, ed, and ex. This was because the interaction between computers and devices like teleprinters, which were similar to typewriters, was not synchronized, requiring manual command input and displaying. It was a cumbersome process. vi revolutionized this by incorporating the Visual mode, which utilized the newly invented computer terminal for synchronized input and display, allowing full-screen editing and astonishing users. However, vi inherited the "cruel" interface of ex, requiring commands to be entered for editing.
vi requires memorizing commands in order to use and edit, earning it the nickname "newbie-killing editor". Interestingly, there are numerous vi-compatible derivatives competing for the "magic throne." Some of the more famous ones include Vim, Elvis, Nvim, and Vile.
Vi stands for "Visual Interface," and compared to line editors, vi's screen editor was considered quite advanced at the time. Since graphical user interfaces and drop-down menus were nonexistent due to hardware limitations, editing had to be done through command-based interaction.
The advantage of this command-based approach is that it requires minimal software and hardware resources, and once familiar with the commands, editing can be faster than using a mouse or drop-down menu. Personally, I believe that once you become proficient, vi is quite useful. It just has a slightly steeper learning curve, which is why it became the "official" editor for Linux/UNIX systems. Furthermore, vi follows the principle of "returning to simplicity," as it has versions available for various operating systems such as DOS, Windows, macOS, Unix, and Linux, eliminating the need to learn different editors for different operating systems.
Most Linux distributions (such as Fedora, GentOS, Redhat) have replaced vi with Vim (vi may be an alias for Vim). Vim stands for "Vi Improved" and offers many additional features compared to the original vi. Some Linux distributions may use Elvis or Nvis as alternatives to vi, but the operations are similar. Pure vi is rarely used nowadays, so subsequent explanations will be based on Vim. When referring to vi, it essentially means Vim, without making a distinction between the two.
Basic operations in vi
The first time you use vi (vim), you will feel very different from any text editor you are familiar with today. The operation is very unintuitive and alternative, very Unix style, because they are all commands. But once you are familiar with it, you will find it more convenient than most text editors. Before the introduction, we first create a practice file "vi_practice". The operation of creating a practice file is as follows:
$ cat -n /etc/man_db.conf | col -x > vi_practice
(The nam of the configuration files for different Linux distributions vary. For example, the file name may be "/etc/man.config". You can use the command man man to find out more information.)
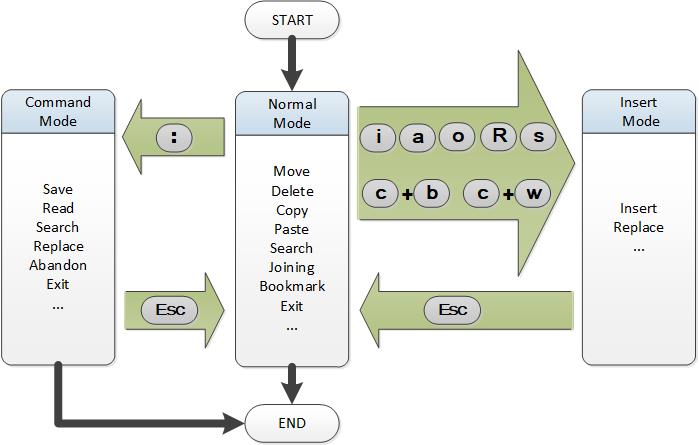
Then enter vi vi_practice (or vim vi_practice) in the text interface to enter vi to edit the practice file ( and if the file does not exist, it will be created, but the content is empty). vi is very special. When you enter vi, you will enter the "Nnormal Mode", where you can only move the cursor, search, delete, copy and other limited editing actions. And if you want to input text, you need to press i or R key to enter "Iinsert Mode" before you can enter text. In insert mode, if you want to archive, read files, leave vi, etc., press ESC again to return to Normal Mode and then press : to enter the so-called Command Mode
In other words, vi revolves around the Normal Mode, but you can enter the Insert Mode or Command Mode. To return to the Normal Mode from either of these modes, you press ESC. The operations are illustrated in the following diagram:
Enter vi to edit the exercise file just created, the screen is as follows:
$ vi vi_practice↵ Enter
1 #
2 # Generated automatically from man.conf.in by the
3 # configure script.
4 #
5 # man.conf from man-1.6e
6 #
7 # For more information about this file, see the man pages man(1)
8 # and man.conf(5).
9 #
10 # This file is read by man to configure the default manpath (also used
11 # when MANPATH contains an empty substring), to find out where the cat
12 # pages corresponding to given man pages should be stored,
13 # and to map each PATH element to a manpath element.
14 # It may also record the pathname of the man binary. [This is unused.]
15 # The format is:
16 #
17 #
MANBIN
pathname
18 #
MANPATH
manpath_element [corresponding_catdir]
19 #
MANPATH_MAP
path_element manpath_element
20 #
21 # If no catdir is given, it is assumed to be equal to the mandir
22 # (so that this dir has both man1 etc. and cat1 etc. subdirs).
23 # This is the traditional Unix setup.
24 # Certain versions of the FSSTND recommend putting formatted versions "vi_practice"
30L, 1745C
24,5 Top
The part marked in red at the bottom of the vi editor is called the "status line." It displays different messages depending on the operation being performed. When you enter vi, you are in Normal Mode where you can only move the cursor using arrow keys, Page Up, Page Down, or delete text using the Delete key, but you cannot insert text.
To insert text, you need to press the i (insert) or R (replace) keys (note that the capitalization matters). At this point, the status line will display "-- INSERT --" or "-- REPLACE --" messages, indicating that you are in Insert Mode or Replace Mode respectively. You can then enter text to modify the data (try it out for yourself).
To exit vi or save the file, press ESC to return to Normal Mode (the "-- INSERT --" or "-- REPLACE --" messages will disappear), and then press : to enter the so-called Command Mode. In command mode, the status line will display a ":" followed by a command. For example, entering ":q!" will exit without saving, ":x" will save and exit, or ":w FILE_NAME" will save the file with a new name (replace FILE_NAME with the desired file name), followed by ":q" to exit vi.
Sometimes you may want to temporarily leave vi to execute a Linux shell command without giving up your editing progress. In command mode, you can enter ":!COMMAND" (where COMMAND is the Linux command you want to execute, e.g., ":!ls"). After the Linux command is processed, press ENTER to return to vi and continue editing.
To be honest, if you don't frequently edit text files (such as writing software or editing web pages with a text editor), knowing these basic operations is enough (you don't need to continue reading). Knowing how to operate Linux and knowing vi are two different things. Otherwise, the "newbie-killing editor" of vi might wear off your interest in learning Linux. Its reputation as the "novice killer" is not unfounded.
However, if you do frequently edit text files, I recommend taking some time to understand the advanced operations of vi.
Modes of operation in vi
The
operation of vi can be very complicated. You can define macro/script (macro) by yourself, and you can cooperate with regular expressions and have your own configuration files and instructions. Therefore, it is impossible to give a complete introduction in this article. This only explains the parts that I think are commonly used. If you feel insufficient, you can refer to related books on the market.
I bet that the "novice killer editor" vi cannot be used just by reading the manual or this chapter. The only way is to follow the example and do it once and practice more. Be sure to do it yourself to ensure that it is worth the fare.
Traditional vi only has Normall Mode, Insert Mode and Command Mode, while vim has added useful functions such as Visual Block Mode and Multi-Winodw mode. The main functions of the mode are as follows:
Normal Mode:
move the cursor, replace/delete, search, save and leave, but cannot insert new text.
Insert Mode:
Insert new text or replace previous text.
Command Mode:
It mainly inherits some editing commands from the line editor ex .
Visual Block Mode:
"block" (marked in reverse) can be used to select the text to be deleted or copied. Editors under Windows rarely have the most useful and unique functions of "block".
Multi Winodw mode:
It is one of the main new functions of vim. Bill Joy, the author of vi, has always wanted to add the function of splitting windows to vi, but half of the development was interrupted due to machine failure and no backup. Fortunately, his successor Or vim completes this function.
Generally, when editing text, each mode is used crosswise.
Generally, when editing text, each mode is used crosswise.
When entering vi, you enter the Normal Mode by default. After pressing keys like i/ o /a or R etc., the status line will display "-- INSERT --" or "-- REPLACE --" to indicate entering Insert or Replace Mode. Pressing : takes you to the Command Mode (the status line will show ":"). Remember to press ESC to return to the Normal Mode. In the Normal Mode of vi, you cannot insert new text, but you can perform operations such as moving the cursor, deleting, changing upper or lower case, searching, and more. The available actions are as follows.
Arrow keys
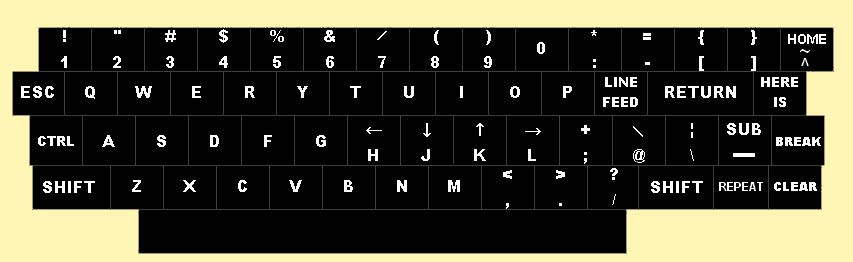
The cursor movement in vi is quite unique, as it uses the keys h, j, k, l (lowercase L) as directional keys. Why is it so "cruel"? The reason is that Bill Joy developed vi using the "ADM-3A" terminal, which had a keyboard different from the familiar IBM PC keyboard. The "ADM-3A" terminal keyboard did not have dedicated arrow keys. Instead, the left and right keys were shared with h and l, while the up and down keys were shared with k and j. The keyboard layout is as follows:
But modern vi has become much more "user-friendly." In addition to the h, j, k, l keys, it also accepts the arrow keys on the IBM-PC keyboard. However, there are advantages to the traditional method as well. Some workstations may not have dedicated arrow keys, and the h, j, k, l keys are closer to the center of the keyboard, making typing faster.
Furthermore, vi offers great flexibility in its command combinations. Most commands accept a combination of <number>+<key>. For example, entering 5h or 5← moves the cursor five spaces to the left, while entering 3j or 3↓ moves the cursor three spaces down. Other ways to move the cursor include the following:
Quick cursor movement
Ctrl+f
The Ctrl+f key combination is used to scroll down a page. To perform this action, you would hold down the Ctrl key and then press the f key. If you are using an IBM-PC keyboard, this is equivalent to pressing the Page Down key.
Ctrl+b
Scroll down a page, If you are using an IBM-PC keyboard, this is equivalent to pressing the Page Up key
Ctrl+G
Displays the file line number and the current position of the cursor in the file (displayed in %) in the status status line.
0
(Number zero, not English O) the cursor moves to the beginning of the line, such as using an IBM-PC keyboard, which is equivalent to Home .
$
Move the cursor to the end,equivalent to End 。
+
Move the cursor down one line, and to the beginning of the line of text,equal to Enter key..
-
Move
the cursor up one line, and to the beginning of the line of text.
space
key moves the cursor one space to the right, similar to the arrow keyl (lowercase L) or → , but it will fold to the next line when it encounters the end of the line.
M
Move the cursor to the beginning of the text in the middle line of the current page.
gg
Move the cursor to the beginning of the file.
G
Move the cursor to the beginning of the last line of text in the file, if you add a number in front, you will jump to the beginning of the line of text, if you input 35G , you will directly jump to the beginning of the 35th line of text.
|
("|" is the symbol of the pipelines ) move the cursor to the front of the line, if you add a number in front, then shift the value to the right (for example, enter 5| ).
w
Cursor moves back a word , and the cursor stops at the beginning of the word. Take the practice file "vi_practice" as an example, first move the cursor to the beginning of the second line (for example, enter 3w ), then press w and the cursor will stop in the following places marked with the bottom line, and vi will check the punctuation all are treated as one word.
1 #
2 # Generated automatically from man.uconf.in by the
3 # configure script.
e
The cursor moves back one word, and the cursor stops at the end of the word.
b
The cursor moves forward one word, and the cursor stops at the beginning of the word.
)
To move to the beginning of the next sentence. (vi defines a sentence as judging by ending with punctuation marks ".", "!", "?" etc.,).
(
Move to previous sentence.
}
Move to the beginning of the next paragraph. (Vi's definition of a paragraph is judged by whether there is a blank column).
{
Move to previous paragraph.
%
Brackets are automatically matched. When the cursor stops at upper brackets such as "(", "{", "[", pressing % will automatically go to the corresponding lower brackets ")", "}", "]".
Most of the cursor movement can be expressed using the notation <number>+<key>. For example, entering 5w moves the cursor forward by 5 words. Similar combinations include 4+, 8space, 2e, 7G, 3L, 9|, and others. These flexible options make vi editor unmatched by other text editors.
Bookmarks
If the file to be edited is very large, quickly moving the cursor is not enough. The bookmark function of vi can quickly return to the desired place no matter where the cursor is moved, which greatly increases the convenience of editing.
m ALPHA
Marks bookmarks (where ALPHA is any English letter a...z, so a maximum of 26 bookmarks can be marked).
` ALPHA
Returns to the bookmarked position. ("`" is the key to the left of the keyboard number "1").
' ALPAH
Goes back to the first character of the line for the bookmark. (「'」 is the key to the right of the keyboard 「;」).
For example, if you find a position on the third line of the practice file and input mi (the mark is "i"), then enter mj (mark it as "j") on the tenth line , and then move the cursor no matter where Just enter `i and `j and the cursor will return to the original mark.
1 #
2 # Generated automatically from man.conf.in by the
3 # configure miscript.
4 #
5 # man.conf from man-1.6e
6 #
7 # For more information about this file, see the man pages man(1)
8 # and man.conf(5).
9 #
10 # This file is read by man mj to configure the default manpath (also used
11 # when MANPATH contains an empty substring), to find out where the cat
12 # pages corresponding to given man pages should be stored, (The following is omitted)
zEnter
(Hold down the lowercase z and press Enter again ) the position of the cursor moves to the first line with the scroll. For example, in the practice file "vi_practice", move the cursor to the 50th line, and after typing zEnter , the position of the cursor moves to the first line with the scroll (the 50th line becomes the first line).
z.
The position of the cursor moves to the middle with the scroll.
z-
The position where the cursor is moved to the last line with the scroll.
Replace a Character
r
"r" for "replace"; replace a character . If there is only one character to be changed, press r at the position of the cursor , and then input a new character to replace the original character.
~
After pressing ~ at the position of the cursor , the case will be swapped.
Replacement is also applicable to
<number>+<key>
, such as inputting 3rS will replace other characters with 3 uppercase "S" at a time, and 4~ will exchange 4 characters at a time.
Deletion
Delete using the key d in combination with keys like dwb$0G. d stands for "delete" , and as only deleting a character, use the button x ; "x" is a pictogram and is easy to remember.
x
(Lowercase x) Delete the character at the cursor.
dd
Deletes the entire row where the cursor is located.
dw
Delete a single word after the position of the cursor (For example, "this is a pen" has four words, separated by punctuation marks or spaces).E.g. move the cursor to the word "configure" in the third line of the practice file, and press dw as follows:
3 # dwconfigure script.
4 # (The following is omitted)
db
Delete a single word forward from the position where the cursor is located.
d$ or D
deletes the position where the cursor is located to the end of the line.
d0
The position where the cursor is located is deleted to the beginning of the line.
dG
The position where the cursor is located is deleted to the end of the file.
dgg
The position of the cursor is deleted to the head of the file.
vi is really flexible, and deletion can also be combined with the <number>+<key>
, such as 3x to delete 3 characters, 5dd to delete 5 lines. Joining lines
J
(Capital j; "j" for "joining") is to connect the next line where the cursor is to the line where the cursor is, for example, move the cursor to any place in the second line of the practice file, press J as follows :
1 #
2 # Generated automaticJally from man.uconf.in by the 3 # configure script. (The following is omitted)
It is unavoidable that the common J can also cooperate with <number>+<key>, such as 3J means pressing three Js in succession
Indentation
>>
To indent or shift the line where the cursor is located to the right by 8 spaces, it actually inserts a horizontal tab character (ASCII = 09HEX) at the beginning of the line. If you input "3>>", it will consecutively shift the next 3 lines to the right.
<<
Iit moves the line where the cursor is located to the left by 8 spaces.
Searching
/ PATTERN
To search for the "PATTERN" below the current cursor position ("PATTERN" is the template of regular expressions ) For example, inputting /\<[Tt]he\> will search for the single word "The" or "the" at the position of the cursor. If you don't use the regular expression, you can use the string directly, but it will be less accurate, such as / the , will search for any string with "the" such as " these" or " they".
n
Go down and search for "PATTERN".
?PATTERN
The position of the cursor, search up.
N
Go up and search for "PATTERN".
*
Search down for the word where the cursor is located. For example, the cursor stops at the position of the word "configure" in the third line of the practice file, press * and this word becomes the target to be searched.
g*
Same as above, but the search only needs to be partly matched. For example, you want to search for the word "is", but the word "this" also matches.
#
Search up the word where the cursor is located.
g#
Same as above, but the search only needs to be partly matched.
f CHAR
The position where the cursor is located, search for characters to the right ("CHAR" is any character), and only limit the row where the cursor is located. For example, fa is the position of the cursor, search for the character "a" to the right.
;
In terms of functionality, to search for the same character to the right.
,
In terms of functionality, to search for the same character to the left.
In some Linux distributions, by default, vim will highlight the searched strings, which sometimes hinders editing. At this time, you can enter ":nohlsearch" (no hi-line search) in the command mode to eliminate the highlighting .
Copying/Pasting
The copy in vi is to use the key y ; "y" for "yank", and the key to paste is p , "p" for "put" . The copied data vi will store it in RAM (vi is called "register" for this term), and when pasting, it will call out the registered data. But not only the key y can be used to paste, in fact, the deleted data is also put into the register, and the key p can also be used to paste.
yy
Copies the row where the cursor is located.
yw
Copy the word at the position of the cursor.
yg
Copies the position where the cursor is to the end of the line.
y0
(The number 0 after y) copies the position where the cursor is to the beginning of the line.
yG
Copies the position of the cursor to the end of the file.
ygg
Copy the position of the cursor to the beginning of the file.
p
paste it.。
Example of copying with
<number>+<key>
such as 3yw or y3w is to copy 3 characters, 5yy is to copy 5 lines.
Undo
u
Undo. This is the most useful command in my opinion. In addition to moving the cursor, any changes in the file (such as deleting, replacing, inserting text, etc.) can be restored by pressing u to restore the previous actions . What's even better is that vim supports almost unlimited undo actions.
Repeat the previous action
.
Command to repeat the previous action. Any action that changes the contents of the file mostly applies the key . to repeat the last command. For example, the previous action is delete, paste, Indent, joining. etc., just press . again to be equal to the previous action.
Save and exit vi
ZZ
Write and quit vi. Regardless of whether the file has changed or not, after entering ZZ (both Z are uppercase), the current file will be saved, and then vi will be exited.
Compared with the Normal Mode , the Insert Mode is relatively simple, and its main function is to insert or replace the previous text. After entering the Insert Mode, vi will display messages such as "-- INSERT --" or "-- REPLACE --" at the bottom, press ESC to return to the Normal Mode, and the relevant operations are as follows:
i
Inserts text before the cursor. (Key i for insert").
I
Insert text from the beginning of the line where the cursor is located.
a
Inserts text after the cursor. (Key a for "append").
A
Inserts text at the end of the line where the cursor is located.
o
Inserts a blank row below the row where the cursor is located. (Key o for "open new line").
O
Inserts a blank row above the row where the cursor is located
s
Deletes the character where the cursor is located and starts inserting text. (key s for "substitute").
S
Deletes the row where the cursor is located and starts inserting text.
R
Starts replacing the old text at the cursor position. (Key R for "replace").
cw
Replaces a word. (Key cw for "change a word").
For example, move the cursor to the word "configure" in the third line of the practice file, press cw , the word will be deleted first, and then a new word will be required to be input, as follows:
3 # cwconfigure script.
4 # (following is omitted)
It can also be combined with <number>+<key>, such as 2cw or c2w to delete two characters first and then require input.
c0
Replaces all characters before the cursor to the line.
c$
replaces the cursor to all characters after the line.
cc
Is the same as S (capital).
Any edits made in the Insert Mode can be restored with the key u in the Normal Mode, or key . to repeat the action. (Remember to press ESC to return to the normal mode), so users can test various functions arbitrarily during practice. Anyway, vim supports almost unlimited recovery.
1.3 Command Mode
The command mode of vi is mainly used in actions such as read/write, search/replace, copy/delete/move. Some actions partially overlap with the Normal Mode , so why is there a command mode? Because vi is a page editor with the Visual Mode function added to the line editor ex , it inherits the command operation of ex , and a brief introduction to ex will be given later. operate.
Introduction to ex line editor ex is a very old editor, which uses "line" as the editing unit. In fact, in many Linux distributions, ex is a link file of vi , the two are the same program, and vi is ex with the Visual Mode function added.
Let's experience the usage of ex in retro style !
$ ex vi_practice↵ Enter← Edit practice files with ex, the screen is as follows
Entering Ex mode. Type "visual" to go to Normal mode.
:_
As above, the ex is very primitive. Once you enter it, you can’t see the article to be edited. It will only display ":" which means waiting for the user's input command + Enter (for the follow-up instructions, Enter is omitted, but don't forget it when practicing by yourself). After entering, you may be prompted to enter "visual" or "vi" to return to Visual Mode and return to vi. Its main functions are as follows:
Line editing
In ex , to display the edited content, you must first enter the line number (the cursor will also stop at the line number), as in the following example:
:2p←Output the 2nd line("p" means print & can be omitted)
2 # Generated automatically from man.conf.in by theg
:1,5←Output 1 ~ 5 lines (omit "p")
1 #
2 # Generated automatically from man.conf.in by the
3 # configure script.
4 #
5 # man.conf from man-1.6e
The line number has many auxiliary usages, such as "." stands for the current line, "$" stands for the last line, and "%" stands for the first line to the last line, examples are as follows:
:% ←Display the first line to the last line (all content)
:1,.←Display the 1st line to the line where the cursor is located
:100,$←Display the 100th line to the last line
If you don't know the current line number, file name, or file size, you can do the following:
:args←Display the name of the currently edited file (args can be abbreviated as ar)
[vi_practice]
:= ←Display the total number of lines in the file
151
:.=←Display the position of the cursor
5
Of course, it is no longer necessary to use the original line editor. Enter "visual" or "vi" under ex to return to the full-screen vi editor.
In the vi full-screen editor, press : to enter the Command Mode (a colon ":" will appear at the bottom left of the screen, as shown in the figure below) to execute ex commands and press ESC to return to the Normal Mode (a colon ":" will disappear).
$ vi vi_practice↵ Enter
1 #
2 # Generated automatically from man.conf.in by the
3 # configure script. (The middle output portion is omitted)
23 # This is the traditional Unix setup.
24 # Certain versions of the FSSTND recommend putting formatted versions :←in vi Press
<:>
at any place, and a colon ":" will appear on the bottom left of the screen, which means entering the Command-Mode to execute ex commands, press
<ESC> to return to the Normal-Mode
In the follow-up Command Mode introduction, users can use vi's Command Mode or the line editor ex to practice, and the results are the same.
Deleting, copying, and moving
It is the most flexible and convenient way to delete, copy and move the line numbers in ex and cooperate with other ex commands, which can make up for the deficiency of the Normal Mode . Especially used for deleting, copying and moving blocks; where "d" in the ex command is for deletion, "m" is for moving, "t" or "co" is for copying.
Example:
:1,10d←Delete lines 1~10 :.,$d ←Delete the position of the cursor to the last line :5,10m15 ←5~10 lines, move to after line 15 (insert from line 16) :.,$m1←The position of the cursor to the last line Move to the 1st line :1,10t15←Copy the 1~10 line to the 15th line :.,$co20 ←The cursor position to the last line and copy to the 20th line
Saving, exiting
If you want to leave the file or archive currently being edited, the relevant commands are organized as follows:
:q
If there have been changes to the file but haven't been saved, you will not be allowed to exit vi .
:q!
Forced to leave vi without archiving. ("!" has a mandatory meaning)
:[RANGE]w [FILE_NAME]:
Regardless of whether the file has been changed, it will be saved (if there is an added file name, it will be saved as FILE_NAME).
In addition, part of the file can also be saved as another file, and its usage is as follows:
:1,10w My_file ←Save lines 1~10 as "My_file" :.,$w File1 ←Cursor position to the last line, save as "File1" :5,13w >> MyFile.txt←5~13 lines , the output accumulation is redirected to the file
In the last example, it can even be redirected to a file, isn't it cool!
:w! [FILE_NAME]
Sometimes you may want to use vi to replace the command cat , you can use vi -R FILE_NAME to open the file to "read-only" mode, which can avoid accidentally changing the file content, but you can still use "w!" to force archive.
:wq
Force save and leave
:x
Only when the file has changed, save it and leave vi or ex, by the way , otherwise leave directly. The biggest difference between this usage and ":wq" is that ":wq" will definitely change mtime , but ":x" may not.
:e!
Abandon the edit before the last archive, but will not leave vi.
:f FILE_NAME :
Save as FILE_NAME.
Searching
:[RANGE]g[!]/PATTERN[/nu]
The command to search is ":g", but "g" can be omitted, and the option of range [RANGE] can be added in front of it to narrow the scope to be searched, if there is no such option means to search the entire file. The searched PATTERN can be any legal regular expressions. the other option [!] is reverse search, [/nu] is to list the line number.
E.g.
:g/The\|the←To search for the word "The" or "the" using regular expressions :/The\|the ← Same as above (omit "g") :50,100/linux← Search for "linux" in lines 500~100:.,$g/HELLO ←The position of the cursor reaches the last line, search for "HELLO" :10,15g!/is/nu←List the lines that do not contain the "is" string in lines 10~15, and list the line numbers
Replacing
:[RANGE]s/OLD_PATTERN/NEW[/c,e,g,i]:
Replacement command is ":s", the string NEW will replace the string OLD_PATTERN, and OLD_PATTERN can be a regular expressions . The range [RANGE] can be added in front, if there is no range, it will only replace the row where the cursor is located; the meanings of other options [c, e, g, i] at the end are as follows:
c
confirm before each replacement
e
do not display error messages.。
g
global replacement, do not ask.
i
ignor letter case, the replaced part is not case sensitive.
Example:
:.,$s/is/are/gi ←The position of the cursor to the last line, "is" or "Is" regardless of case are all replaced by are :1,$ s/colou*red/COLOURED/g ←one go to the last line and search for "coloured" or "colored" with regular expressions and replace with "COLOURED" :5,20s/the/The/c ←In lines 5~20, replace "the" with "The" and ask for confirmation
replace with The (y/n/a/q/l/^E/^Y) ← Press <y> to replace, <n> not to replace, <a> to replace all, <q> to discard all, <l> (lowercase L) only Replace a line or press <Ctrl+E>/<Ctrl+Y> to page up and down
In addition, search/replace can be mixed and matched. If the target is found, the action of replacing it later is really powerful.
Example:
:g/apple/s/banana/orange/g←First use the search command ":g" to search for the string "apple" in the line, if there is such a string, replace "banana" with "orange" in the same line, (If there is no "apple" string, it will not be replaced even if there is "banana")
Executing Shell Commands
Sometimes you want to execute some commands temporarily, but you don't want to leave vi. At this time, it is really convenient to use ":!SHELL_COMMAND" to execute Shell commands without leaving vi.
Example:
:!cp fileA fileB↵ Enter
Press ENTER or type command to continue
If you want to edit the output of a command, add ":r" at the front.
Example:
:r !seq 1 10↵ Enter
Deleting bookmarks
If many bookmarks may be set during the editing process , sometimes you may forget how many bookmarks you have set, or you can delete the bookmarks when they are not needed.
:marks
lists all set bookmarks.
:delmarks ALPHA (lowercase English letters)
For example, enter ":delemarks a" to delete bookmark a, ":delemarks ci" to delete bookmark c and bookmark i, ":delemarks xz" to delete bookmarks x to z.
Sometimes it is possible to edit multiple files at a time, vi has powerful multi-file editing capabilities, and the data between different files can be copied/pasted to each other .
Loading Files
vi There are two ways to open multiple files at the same time, one is to load when entering vi, and the other is to load with commands in Command Mode . The files are loaded into "buffer" (memory) so that vi can switch quickly. The usage of loading multiple files into vi is as follows: Example: when entering vi,
load multiple files by the way.
$ vi file1 file2 file3←load file1 file2 & file3 (if a file does not exist, create a new file)
Example: enter vi first, then use the command ":e FILE" to load the file
:e file2← load file2
Sometimes you forget that those files have been loaded into the buffer of vi, you can issue the command ":ls" or ":files" to list all the loaded files.
example:
:ls←to list the loaded files, if a file is listed as "%a", it indicates the file currently being edited, while "#" represents the file edited in the previous session.
1 %a "file1"
line 1
2 # "file2"
line 0
3 "file3"
line 0
Switching between files
If you want to switch the file to be edited, use the command ":e FILE" to load it to switch the file to be edited, but you can also use the following more convenient methods
:bn buffer next,switch to the next loaded file.
:bp buffer previous,switch to the previous loaded file.
:bf buffer first,switch to the first loaded file.
:bl buffer last,switch to the last loaded file.
:b#
Switch between the previous file and the current file. (or press Ctrl + Λ in Normal Mode )
If the current file has been changed but has not been saved, you will not be allowed to switch to other files. At this time, you can use "!" such as "bp!" to force the switch.
Sometimes when you switch between files, you may not know which file is currently being edited, or a file has been edited. To exit the buffer, you can use the following command:
:f
ile , display the currently edited file. (or press Ctrl + g in Normal Mode )
:bd [FILE] buffer delete,delete the loaded file, if the file has been changed but not saved yet, vi will not let the user move the file out of the buffer, if you really want to give up and move out of the buffer, just Use ":bd!". For example, if ":bd" is not followed by the file name, it will move out of the file currently being edited.
:[LINE]r[FILE]
:[LINE]r[FILE]
Insert the content of the file. If the option LINE is omitted, FILE will be inserted from the cursor. If FILE is omitted, the file currently being edited will be inserted.
Most editors operate in units of lines, but vi(m) has a "block editing" capability that most editors do not have, The so-called Visual Block means that the text to be copied or deleted can be processed in a square frame. Press Ctrl + v.
in the Normal Mode to enter the Visual Block Mode. At this time, "VISUAL BLOCK" will appear on the lower left of the screen, and press ESC to return to the Normal Mode. Move the cursor in the Visual Block Mode to highlight the framed text, as follows:
HAMLET:
To be, or not to be: that is the question:
Whether 'tis nobler in the mind to suffer
The slings and arrows of outrageous fortune, ↓Press <Ctrl+v> to enter Visual Block mode, move the cursor to reverse white framed text
Or to take arms against a sea of troubles,
And by opposing end them? To die: to sleep;
No more; and by a sleep to say we end
The heart-ache and the thousand natural shocks
That flesh is heir to, 'tis a consummation
Devoutly to be wish'd. To die, to sleep;
To sleep: perchance to dream: ay, there's the rub;
For in that sleep of death what dreams may come
When we have shuffled off this mortal coil,
Must give us pause: there's the respect
--
VISUAL BLOCK --
82,39 36%
After the text is framed in the Visual Block Mode, you can press d to delete the framed text, or press y to copy, and press p to paste the framed text at the new cursor.
Sometimes it may be necessary to compare between different files, or even compare the context of the same file. The split window function of vi can be easily achieved. Enter ":split" or ":sp" in the command mode to split the window, if ":sp" is followed by a file name, the file that appears in the new split window is the same file otherwise .
The following is to use vi to load a file first, then enter ":sp FILE" to load another file and display it in a split window.
80 # NOCACHE keeps man from creating cache pages ("cat pages")
81 # (generally one enables/disable cat page creation by creating/deleting
82 # the directory they would live in - man never does mkdir)
83 #
84 #NOCACHE
85 #
86 # Useful paths - note that COL should not be defined when
87 # NROFF is defined as "groff -Tascii" or "groff -Tlatin1";
88 # not only is it superfluous, but it actually damages the output.
89 # For use with utf-8, NROFF should be "nroff -mandoc" without -T option. vi_practice 79,5 55%
HAMLET:
To be, or not to be: that is the question:
Whether 'tis nobler in the mind to suffer
The slings and arrows of outrageous fortune,
Or to take arms against a sea of troubles,
And by opposing end them? To die: to sleep;
No more; and by a sleep to say we end
The heart-ache and the thousand natural shocks
That flesh is heir to, 'tis a consummation
Devoutly to be wish'd. To die, to sleep;
To sleep: perchance to dream: ay, there's the rub;
For in that sleep of death what dreams may come hamlet.txt 82,39 36%
By default, vi splits the window horizontally and can split more than two windows. If you want to split the window vertically, the command is ":vertical split" or ":vsplit" or ":vsp".
You can also use the option vi -o FILE1 FILE2 FILEn or vi -O FILE1 FILE2 FILEn to split the window as soon as you enter vi, where the option lowercase "-o" is horizontal split and uppercase "-O" is vertical split window.
After splitting the window, the operations that can be performed in the normal mode are as follows:
Ctrl+ww
Cycle through the split windows.
Ctrl+wj 或 Ctrl+w↓
Switch to the next window.。
Ctrl+wk 或 Ctrl+w↑
Switch to the previous window.
After splitting the window, the relevant command mode commands are:
:only
Only keep the window where the cursor is located, and close other windows. (The closed window must be saved, or use ":only!" to force close without archiving)
:close
Closes the window where the cursor is located. (The closed window must be archived, or use ":close!" to force close)
1.7 Environment configuration
Vim can set its environment according to personal preferences. The overall environment settings of vim are recorded in "/etc/vimrc", and the environment settings of individual accounts may need to be created as "~/.vimrc". If it is temporary, you can enter ":set PARAMETER" in command mode . For example, if you want to display the line number, you can output ":set nu".
Commonly used environment settings are as follows:
Automatically save the current file when editing other files.
Do not automatically save the current file when editing other files.
:set bf
:set nobf
nobf
The entered control characters are not accepted .
Accepts control characters.
:set dir=tmp
dir = /tmp
Set directory for temporary files.
:set eb
:set noeb
noeb
Error messages beep.
Error messages do not beep.
:set hlsearch
:set nohlsearch
hlsearch
Highlight the matching text when searching.
Do not highlight the matching text when searching.
:set ht=
ht = 8
Sets the spacing for horizontal positioning (TAB).
:set ic
set noic
noic
Searches are case-sensitive.
Case differs when searching.
:set list
:set nolist
nolist
Horizontal positioning displays "^I" and new line displays "$", CR displays "^M".
Do not show.
:set nu
:set nonu
nonu
Display line numbers.
Line numbers are not displayed.
:set ro
:set noro
noro
Change the file being edited to read only.
Cancel read-only.
:set sh=shell_path
sh = /bin/sh
Set the shell path (wrong shell path will cause :!COMMAND to fail).
:set fileencoding=
utf-8
Set the encoding format of vim.
:set fileformat=
unix
Valid file formats are "unix", "dos" and "mac", which will affect the way of newline.
:set syntax=
Set the language editor for vim, such as html, c, cpp, java, etc. (the supported programming languages are recorded in "/usr/share/vim/vimXX/syntax")
:syntax off
Cancel the setting of ":set syntax=XXX" (XXX=html,c,cpp, etc.)
1.8 Input control characters and arbitrary characters
Sometimes for some reason, it is necessary to input ASCII control characters , vi (m) can also easily input ASCII control characters, for example, press Ctrl + G to input the control code "BEL", but because of Ctrl + KEY The method is the same as many hotkeys of vi. In order to distinguish between entering control characters, only press Ctrl + V in insert or replace mode and then press Ctrl + KEY.
Example: (input control code "BEL")
^GCTRLVCTRLG ←Press <Ctrl>+V and then press <Ctrl>+G immediately to enter the control character "BEL" (displayed as "^G")
More complete vi input control characters refer to the following table:
vim input control characters
ASCII decima
ASCII hexadecimal
symbol
vi display
Key
000
00
NULL
^@
<Ctrl>+@
001
01
SOH
^A
<Ctrl>+A
002
02
STX
^B
<Ctrl>+B
003
03
ETX
^C
<Ctrl>+C
004
04
EOT
^D
<Ctrl>+D
005
05
ENQ
^E
<Ctrl>+E
006
06
ACK
^F
<Ctrl>+F
007
07
BEL
^G
<Ctrl>+G
008
08
BS
^H
<Ctrl>+H
009
09
HT
TAB
<Ctrl>+I
010
0A
LF
<LF>
<Ctrl>+J
011
0B
VT
<VT>
<Ctrl>+K
012
0C
FF
<FF>
<Ctrl>+L
013
0D
CR
<CR>
<Ctrl>+M
014
0E
SO
^N
<Ctrl>+N
015
0F
SI
^O
<Ctrl>+O
016
10
DLE
^P
<Ctrl>+P
017
11
DC1
^Q
<Ctrl>+Q
018
12
DC2
^R
<Ctrl>+R
019
13
DC3
^S
<Ctrl>+S
020
14
DC4
^T
<Ctrl>+T
021
15
NAK
^U
<Ctrl>+U
022
16
SYN
^V
<Ctrl>+V
023
17
ETB
^W
<Ctrl>+W
024
18
CAN
^X
<Ctrl>+X
025
19
EM
^Y
<Ctrl>+Y
026
1A
SUB
^Z
<ctrl>+Z
027
1B
ESC
^[
<Ctrl>+<ESC>
028
1C
FS
^\
<Ctrl>+\
029
1D
GS
^]
<Ctrl>+]
030
1E
RS
^^
<Ctrl>+6
031
1F
US
^_
<Ctrl>+_
127
7F
DEL
~
<Ctrl>+?
vi can also directly type ASCII codes, such as "¥", "¶", "Ã" and other strange symbols.
Just press Ctrl + V and then type the ASCII (or EASCII) code to enter the ASCII code, and can accept decimal/octal/hexadecimal ASCII codes, and even Unicode can be directly input, the usage is as follows: