Directory Operations
Although Linux does not have the concept of C/D/E drives like Windows, the concept of directories (folders) is quite similar. In the Linux text interface, as long as you understand "absolute paths" and "relative paths," the rest is similar to the concept of directories (folders) in Windows, so it should be easy to understand.
The directory representation in the text interface is "/www/xxx/yyy/zzz/...", which is called the directory structure or "path." If the current directory is "xxx," the current directory is called the "working directory." The parent directory of "xxx" is "www" and is called the "parent directory," while the next-level directory of "xxx" is "yyy" and is called the "subdirectory." The parent and subdirectories are separated by "/", and they are relative names. The leftmost part, which is the top-level "/", represents the "root directory." If there is no parent directory, it is called the "root directory."
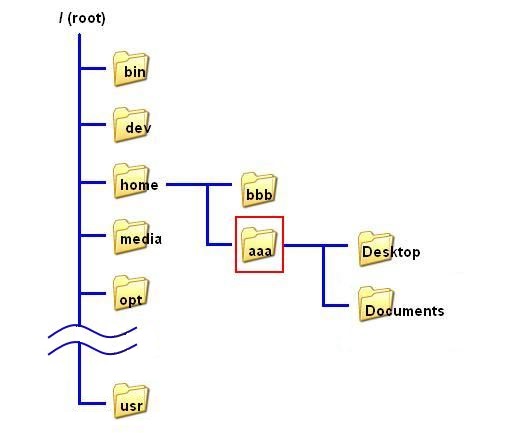
For example, if I have created two user accounts, "aaa" and "bbb," the actual directory structure would be as shown in the diagram below:
When logged in with the "aaa" account in the text interface, the working directory would be "/home/aaa" (highlighted in red). Its parent directory is "home," and "Desktop" and "Documents" are both subdirectories of "aaa."
pwd: Display working directory
When operating in the Windows directory, the Windows File Manager typically displays the complete path or shortcut of the working directory, such as "C:\Users\john" (In Windows, the separator between parent and child directories is "\", which is different from UNIX/Linux, where it is "/". Make sure not to confuse them).
However, in the text-based interface of Linux, the default environment usually only displays the working directory without the path. To find out the current working directory, you can use the command pwd (print working directory), as shown below:
Syntax:pwd [-otpiton]
Command name/Function/Command user
Ooptions
Function
pwd/
print working directory/
/Any
-P (uppercase))
If the working directory is a link, it will display the actual working directory, not the link itself
例:
[aaa@localhost ~]$ cd ~←Enter your home directory
[aaa@localhost ~]$ pwd←Display the complete working directory for the account "aaa"
/home/aaa
[aaa@localhost ~]$ cd /var/mail←Enter the directory "/var/mail"
[aaa@localhost mail]$ pwd ←Enter the directory "/var/mail"
/var/mail
[aaa@localhost mail]$ pwd -P ←List the actual working directory for non-symbolic links
/var/spool/mail
In the previous example, we used cd ~ to enter the home directory of the logged-in user. Based on the experiments mentioned above, it can be inferred that the home directory for regular users is "/home/xxx" (where xxx is the username), while the home directory for the root user is "/root". If the working directory is a symbolic link, you can use pwd -P to display the actual working directory.
tree: Display directory tree
The command pwd only displays the current working directory. If you want to see the subdirectories or parent directories within the working directory, you can use the tree command.
Syntax:tree [-otpiton][--option] [path]
Command name/Function/Command user
Options
Function
tree/
display directory tree/
Any
-a
Expand and list all files and directories. Include hidden files starting with "."
-C
Use colored listings (different colors for directories and files)
-d
Only list directories and not files
-F
Adds special characters to indicate different file types
"/": Directory
"=": socket file
"*": Execution file
"|" : FIFOfile
"@": link file
List files and directories matching PATTERN + wildcard combination
-l
If the directory is a link file , directly list its original directory
-L level
List only a few levels of directory order
-x
Only list the current file system
(for example, the current file-system is ext3 , but some directories may be ext2 or FAT, etc. will be excluded)
--help
Displays the command's built-in help and usage information
例:
$ tree -L 1 /←lists the first-level directories starting from the root directory ("/")
/
|-- bin
|-- boot
|-- dev
|-- etc
|-- home
|-- lib
|-- lost+found
|-- media . . .
例:
$ tree ← Without specifying a directory, it will list the files and subdirectories in the current working directory
.
|-- Dektop
|-- Documents
|-- Download
|-- Music
|-- Pictures
|-- Public
|-- lost+found
例:
$ tree -d /home←it will list the subdirectories within the "/home" directory, and only directories will be displayed (excluding files)
/home
|-- aaa
| |-- Desktop
| |-- Documents
| |-- Music
| |-- Pictures
| |-- Public
| `-- Videos
`-- bbb [error opeing dir] ← indicates that the "bbb" directory could not be accessed, likely due to insufficient permissions
cd: Change directory
To change the working directory, if permission is granted, you can use cd [path] (change directory) to freely change the working directory.
Example:
[aaa@localhost ~]$ cd /bin
[aaa@localhost bin]$ ← The prompt has changed, indicating that you have entered the /bin directory.
[aaa@localhost bin]$ pwd←Check with the pwd command
/bin
[aaa@localhost bin]$ cd /root←Let's take a look at the root home directory
-bash: cd: /root: Permission denied ←You can't access it because you don't have sufficient permissions
In addition, Windows commonly uses spaces in directory or file names. When dealing with directories or files that have spaces, you need to enclose the path with double quotes " or single quotes '.
For example: cd "/home/aaa/My Documents"
or cd '/home/aaa/My Documents'
or cd /home/aaa/'My Documents' (use quotes only for the directory with spaces).
In traditional UNIX, naming files or directories prefers using "-" or "_" instead of spaces (e.g., My-Documents or My_Documents). This avoids the need to add quotes to the path. Additionally, directory operations in the command-line interface can be done using "absolute paths" or "relative paths."
Absolute paths
Path names start with the root directory symbol "/" and paths represented starting from the root directory are called "absolute paths." Using absolute paths has the advantage of being less prone to errors, but the downside is that they can be long and cumbersome.
Example:
$ cp -v /usr/share/dict/linux.words /tmp←Copy the file to the directory /tmp (using absolute path)
Relative Paths
Relative paths are calculated based on the current working directory as a reference point. The advantage of using relative paths is convenience, but if the relative position is mistaken, you can end up taking the wrong steps.
To represent the parent directory (one level up), the relative path uses ".." or "../". To specify a subdirectory, simply enter its name to operate within that subdirectory (the next level directory).
Example:
[aaa@localhost /]$ cd /usr/share/dict← Use an absolute path to enter the directory "/usr/share/dict" first
[aaa@localhost dict]$ pwd←Check with the pwd command
/usr/share/dict
[aaa@localhost dict]$ cd ..←Use a relative path ".." to go to the parent directory "/usr/share" (one level up)
[aaa@localhost share]$ pwd←Check with pwd again
/usr/share
[aaa@localhost share]$ cd dict← Use a relative path to enter the directory "/usr/share/dict" again
[aaa@localhost dict]$ cd ../../..←← You can keep going back to the previous directory! (Go back three times to the root directory)
[aaa@localhost /]$ pwd← pCheck with pwd again
/
[aaa@localhost /]$ cd /usr/share←Use an absolute path to enter the directory "/usr/share" first
[aaa@localhost share]$ cd ../sbin←用Use a relative path to go back one level and enter the subdirectory "sbin"
[aaa@localhost sbin]$ pwd← Check the current location
/usr/sbin
Example:
$ mv -v ../../fileA ../←Move the file "fileA" two levels up to its parent directory (one level up)
$ rm ../*←Delete all files in the parent directory
Additionally, Linux has other representations for directory operations:
"~" or "~/" Represents the home directory of the logged-in user.
Example:
$ cp -v /usr/share/dict/linux.words ~/← Copy the file "linux.words" to the home directory
$ cd ~←Go back to your own home directory
"~otheruser" or "~otheruser/" Specifies the home directory of a specific account.
Example: (logged in as root for testing)試)
# cp ~bbb/fileA ~aaa/←複← Copy the file from the "bbb" home directory to the "aaa" home directory
# cd ~aaa←Enter the home directory of the "aaa" account
# ls ~bbb/←List files in the "bbb" home directory
"-" Represents the previous working directory.
Example:
$ cd /bin←Go to the /bin directory
$ cd /etc←Go to the /etc directory
$ cd -← Go back to the previous directory (/bin)
/bin
"." or " ./"
Represents the current working directory.
Example:
$ cp ./file /tmp←Copy a file from the current working directory to /tmp
$ ./backup.sh←Execute a file in the current working directory
The difference between using "." or "./", "~" or "~/", and ".." or "../" with or without a "/" at the end lies in whether there will be a file specified after the path.
When specifying a file after the path, it is important to include a "/" at the end to indicate that the path refers to a directory. For example, in the command cp ./fileA /fileB, However, if no file is specified after the path, both forms are the same. For example, cd ~ is equivalent to cd ~/. The safest approach is to always include a "/" at the end, regardless of the presence or absence of a file.
Another usage of "./" is to serve as a separator. This can be helpful when dealing with unconventional or peculiar file or directory names that might conflict with command options, especially when the name starts with a "-". By using "./" as a separator, you can distinguish the name from command options.
Example:
$ mkdir ./-dir←Create a directory named "-dir"
$ cd ./-dir←進Enter the subdirectory "-dir"
$ cd ..← Go back to the previous directory
$ rmdir ./-dir←Delete the directory "-dir"
In the previous example, if a file or directory name starts with "-", without using "./" as a separator, it would be difficult to perform operations on it.
mkdir: Create directory mkdir stands for "make directory" and is used to create directories in Linux. There are two types of directories in Linux: mounted directories, which are created by mounting a recognizable file system using the mount command, and directories created using the mkdir command.
Syntax:mkdir [-otpiton][--option] directory
Command name/Function/Command user
Options
Function
mkdir/
make directory /
Any
-m
Sets the permission mode for the created directory
-p
Create nested directories (several layers of directories can be created at a time)
--verbose
Show created directory
--help
Displays the command's built-in help and usage information
Let's go through the practical operation of mkdir, but before that, let's understand a special directory in UNIX/Linux called "/tmp".
/tmp directory
To avoid cluttering your home directory, the "/tmp" directory is commonly used for testing purposes. "tmp" stands for "temporary," and the /tmp directory is primarily used for storing temporary computation results. Once the computations are complete, the temporary results should be deleted. However, many commands or programs have the bad habit of leaving junk files in the /tmp directory. Therefore, it is recommended to manually clear the files in the /tmp directory periodically.
Since the purpose of the /tmp directory is to store temporary files, it has special permissions known as the "Sticky bit," which allows anyone to enter and read/write files in the directory. Therefore, important files should not be placed in /tmp, but it is suitable for testing various commands or programs.
Example:
[aaa@localhost ~]$ cd /tmp←Switch to the /tmp directory
[aaa@localhost tmp]$ mkdir dir_test ←Create a directory /tmp/dir_test
In the above example, we used a relative path to create the directory /tmp/dir_test. If we use an absolute path, it would be as follows:
$ mkdir /tmp/dir_test ←Create the directory /tmp/dir_test
For security reasons, by default, directory operations allow creating only one level of subdirectories at a time. But how do we create multiple levels of directories, such as /tmp/level_1/level_2?
Example:
$ cd /tmp←Switch to the /tmp directory $ mkdir level_1/level_2
$ mkdir: canot create directory 'level_1/level_2': No such file or directory ←Why can't we create the directory? By default, directories need to be created one level at a time and cannot create multiple levels at once. $ mkdir level_1 ←Create the directory /tmp/level_1 $ cd level_1←Enter /tmp/level_1
$ mkdir level_2 ← Once inside, create the next level directory /tmp/level_1/level_2
When creating multiple levels of directories, you can use mkdir -p to create several levels of directories at once. It is recommended to use the "--verbose" option along with "-p" to display the created directories and avoid errors.
Although mkdir -p allows creating multiple levels of directories at once, I still prefer creating directories one level at a time to avoid accidentally creating incorrect directories. Additionally, the -m option can be used to set permissions while creating directories.
Example:
$ mkdir -m 770 /tmp/jason_dir←Create a directory and set permissions at the same time
rmdir: Remove directory
The rmidir command (remove directory) is used to remove directories. Its usage is similar to the mkdir command for creating directories, but it has more restrictions. The directory must be empty (no files or subdirectories) to be removed, and by default, it needs to be removed one level at a time.
rmidir is a considerate command that prioritizes caution over accidental deletion. While the rm command can also be used to remove directories, it is more powerful and has the potential to cause unintended harm if used incorrectly. Therefore, it is recommended to use the dedicated rmdir command for removing directories. Here is how it is used:
Syntax:rmdir [-otpiton][--option] directory
Command name/Function/Command user
Options
Function
rmdir/
remove directory /
Any
-p
Remove the nested directory (you can remove several layers of directories at a time, but the directory must be empty)
--verbose
Show removed directories
--help
Displays the command's built-in help and usage information
Example:
$ mkdir -p --verbose /tmp/111/222/333/444←Create multiple levels of directories
$ rmdir /tmp/111←Remove the directory /tmp/111 $ rmdir: /tmp/111: Directory not empty ←The directory contains subdirectories or files and cannot be removed
$ rmdir /tmp/111/222/333/444←Even if all directories are empty, they need to be removed one level at a time (start from the outermost) $ rmdir /tmp/111/222/333
$ rmdir /tmp/111/222
$ rmdir /tmp/111
Example:
$ rmdir -p --verbose /tmp/111/222/333/444←If the directories are empty, you can remove multiple levels at once
$ rmdir dir1 dir2 dir3←Remove directories dir1, dir2, dir3
One of the important philosophies of Linux is that "everything is a file." Understanding file operations gives you control over Linux, making learning Linux seem less difficult, right?
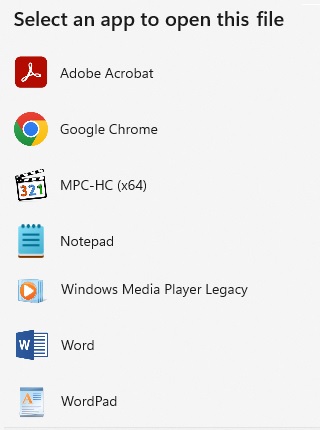
Many people have had the following experience while using Windows: When trying to open a file with an unknown file type, Windows prompts you to choose which program to use to open it (as shown in the image below).
Generally, in Windows, file types are determined based on the file extension (the part after the dot). For example, ".exe" is an executable file, ".jpg" is an image file, and ".ini" is a configuration file. However, in Linux, file extensions are only for "reference." For instance, most executable files in Linux do not have file extensions. To determine the file type in Linux, the file command is commonly used. It is unknown why Windows does not have a similar command like file that is so useful,
file: Identify file type
The file command analyzes known file types as much as possible. It can identify file types such as ELF (executable files), plain text files (ASCII), shell scripts, compressed files, image files, and various other types. It serves as a powerful tool for analyzing and identifying file formats.
Example:
$ file /bin/su←Check what type of file /bin/su is
/bin/ls: ELF 64-bit LSB executable(....)← 64-bit ELF executable (Executable and Linkable Format)
$ file /usr/share/man/man1/gawk.1.gz
/usr/share/man/man1/gawk.1.gz: gzip compressed data, from Unix, max compression ←Gzip-compressed file
$ file /etc/fstab
/etc/fstab: ASCII text ←ASCII plain text file
$ file /tmp
/tmp: sticky directory ← A directory with Sticky bit special permission
$ file /etc/grub.conf
/etc/grub.conf: symbolic link to `../boot/grub/grub.conf' ←Symbolic link
ls: List files
The most frequently used command in Linux is ls. It has a wide range of options, with the total number of options and sub-options exceeding 50.
The basic function of ls (list) is to display files. However, in Linux, "everything is a file." Therefore, Linux files contain a lot of information such as time, permissions, owners, and executability. That's why there are so many options available. But don't worry, there are only a few commonly used options, and if you need to use more obscure options, you can refer to the man page or use ls --help. It's like the complicated roads in Taipei. I'm terrible with directions, but it doesn't affect my daily life because I only take a few routes every day. If I happen to go to an unfamiliar place, I can just use GPS.
Here are some commonly used functionalities and options of ls:
Same as "ls -l" but does not include the owner information
-G
Works in conjunction with "ls -l" but does not display the group information
-h
Works in conjunction with "ls -l" to display file sizes in human-readable format using units such as KiB (kibibytes), MiB (mebibytes), and GiB (gibibytes).
-c
Works in conjunction with "ls -l" to list files based on their ctime
-u
Works in conjunction with "ls -l" to list files based on their atime
-t
Sorts files by time, usually used in conjunction with "ls -l" (default sorting is based on #mtime)
Similar to "ls -l" but displays the GID and UID as numeric values instead of their corresponding names
-m
Displays files in a horizontal comma-separated list format
-o
Does not display the group information (same as "ls -lG")
-p
If the entry is a directory, it will be displayed with a trailing "/" character
-R
Lists files recursively, including all files within directories
-X
Lists files sorted by extension, displaying them in alphabetical order based on their file extensions.
--help
Displays the command's built-in help and usage information
--time==ctime
Same as "ls -c"
--time==atime
Same as "ls -u"
--color=never
Lists files in a black and white format, disabling colorized output
Example:
$ ls /home ←Lists the files and directories in the "/home" directory
aaa bbb john lost+found
$ ls -p ~/ ← Uses the "-p" or "-F" option to distinguish between files and directories (directories will have a trailing "/")
Desktop/ Download/ Pictures/ Public/ Videos/
Documents/ Music/ project Publish
$ ls -a← Files starting with "." are hidden files. Using the "-a" option will show these hidden files
.
Download
.ICEauthority Templates
..
.esd_auth .local
.tomboy
.bash_history .gconf
.metacity
.tomboy.log . . .
Example:
$ ls -l ←Lists files in long format
drwxr-xy-x
2
aaa
aaa
4096
2011-09-07
11:44
Desktop
drwxr-xy-x
2
aaa
aaa
4096
2011-09-07
11:44
Documents
drwxr-xy-x
2
aaa
aaa
4096
2011-09-07
11:44
Music
drwxr-xy-x
2
aaa
aaa
4096
2011-09-07
11:44
Pictures
drwxr-xy-x
2
aaa
aaa
4096
2011-09-07
11:44
Public
↑
↑
↑
↑
↑
↑
↑
↑
file types
and
Permissions
# of
links
owner
group
size
date
time
Files or directories
Example:
$ ls -al ←With the -a option, it lists hidden files and also displays the attributes of the current directory and its parent directory.
total 300
drwx------ 1 aaa aaa 4096 2011-08-02 11:23 . ←Displays the permissions, owner, and group of the current directory.
drwxr-xr-x 26 root root 4096 2010-08-04 01:23 .. ←Displays the permissions, owner, and group of the parent directory
-rw------- 1 aaa aaa 5849 2011-08-02 22:20 .bash_history ← Hidden file starting with "."
-rw-r--r-- 1 aaa aaa 5849 2007-03-10 22:20 .bash_logout
drwxr-xr-x 2 aaa aaa 4096 2010-08-04 01:23 Desktop
. . .
Another option, "-d," is also very useful in my opinion because sometimes I only want to list directories, not files. The correct way to write a directory is to add a "/" at the end of the directory name (similar to the directories listed with ls -p), but it is usually omitted by default. To represent any directory, you can use "/" (where "*" is a wildcard).
Example:
$ ls -d */← List the directories in the current working directory
Desktop/ Download/ Pictures/ Templates/
Documents/ Music/ Public/ Videos/
$ ls -ld /home ← List the detailed information of a directory
drwxr-xr-x 6 root root 4096 2011-08-02 11:23 /home
File Types
The first character displayed by the ls -l command represents the file type. In Linux, where "everything is a file," the concept of "file" can also include hardware devices.
The possible file types in Linux are as follows:
"-": Regular file
A regular file is just a normal file. In addition to regular files and directories, there are also "device files" for files other than symbolic links. Files starting with a "." are hidden files, and files ending with "~" are conventionally used to mark backup files.
"d": Directory
Represents a directory, similar to folders in Windows.
"l": Symbolic link
Similar to shortcuts in Windows.
"b": Block devices
Block devices are used for storage devices listed in device files, such as "/dev/sda" or "/dev/loop0."
"c": Character devices
Character devices include terminal devices (e.g., "/dev/tty1"), or files like "/dev/null" or "/dev/random."
"p": Named pipe (FIFO) Named pipes are mainly used for inter-process communication.
"s": Socket file
Similar to named pipes, socket files are primarily used for network communication such as TCP/IP, e.g., "/var/run/gdm_socket".
Linux Timestamps
Timestamps in Linux There are several options in the ls command related to timestamps because Linux records three types of timestamps for files: atime, ctime, and mtime, each representing the following:
atime (access time): The atime of a file is updated whenever it is read or executed (since executing requires reading). Updating atime for every file access can consume hardware resources, so some older machines, slower laptops, or high-performance computers may disable atime updates. You can disable atime updates when mounting a file system using the command mount -o noatime or by modifying /etc/fstab.
ctime (change time): ctime is updated whenever any change occurs to the file, including changes to permissions, ownership, or file content.
mtime (modify time): mtime represents the time when the file content was last modified. It is similar to the file time in Windows, and the time displayed by ls -l corresponds to the mtime. Among the three timestamps, mtime is the most important.
The table below shows the impact of different file actions on the timestamps in Linux:
File Action
atime
ctime
mtime
Read or execute
Updated
-
-
Change permissions
Updated
Updated
-
Change ownership
Updated
Updated
-
Change file content
Updated
-
Updated
Example:
$ ls -lc ←List files with their ctime (change time)
$ ls -l --time=ctime ←Same as above (ls -lc)
$ ls -ltc ←List files with their ctime and sort by ctime
$ ls -lu ←List files with their atime (access time) $ ls -ltu ←List files with their atime and sort by atime
$ ls -l ←List files with their mtime (modify time)
$ ls -lt ←List files with their mtime and sort by mtime
alias: Command alias
The alias command in Linux allows users to create alternative names for commonly used commands, reducing the time spent typing. For example, the command ls -l is frequently used, so many Linux distributions provide the alias ll (lowercase LL) as a substitute for the command ls -l This functionality is achieved using the alias command, which assigns a nickname to a command. If desired, you can also create aliases for other frequently used commands using the following format: "alias nickname=command to replace." If you simply enter the alias command without any additional parameters, it will display a list of commands that have been assigned aliases
Exampe:
$ alias←Entering the "alias" command without parameters lists the commands with aliases
alias egrep='egrep --color=auto'
alias fgrep='fgrep --color=auto'
alias grep='grep --color=auto'
alias ls='ls --color=tty'
alias vi='vim'
Many Linux users may have experience with the "Command Prompt" in DOS or Windows. To avoid confusion between DOS and Linux commands, aliases can be used to unify the commands.
Exampe:
$ alias md='mkdir'
$ alias rd='rmdir'
$ alias cls='clear'
$ alias copy='cp'
$ alias del='rm'
In the above example, entering the DOS command "md" is equivalent to entering the Linux command mkdir. Both "md" and mkdir can be used interchangeably and have the same functionality.
A more complex example involves commands with options. For instance, the alias rmdir='rmdir -p' adds the "-p" option. But if you want to execute rmdir without the "-p" option, you can temporarily disable the alias by adding the escape character "\" before the command, like \rmdir.
To permanently remove an alias, you can use the corresponding command unalias. The syntax is "unalias [-a] [alias]," where the option "-a" removes all aliases.
例:
$ unalias md←Removes the alias "md"
$ unalias -a←Removes all aliases
Aliases created using the alias command will disappear when you log out. To preserve commonly used aliases, you can write them to the file "~/.bashrc" in your home directory. This file is similar to DOS's "Autoexec.bat" as it executes automatically upon login.
stat: Display file attributes
The ls command provides extensive information, but it can be overwhelming when you only want to view specific file attributes. In such cases, the stat command (file status) is simple and convenient to use. stat directly interprets the contents of the inode.
The stat command is used to display attributes such as atmie/mtime/ctime , file size, file type, inode number, and the number of links. It is a convenient way to obtain important information about a file.
1.2 File Retrieval cat: Read file
UNIX/Linux systems place special emphasis on "plain text files," which are files encoded using ASCII. The reason for this is that any operating system or platform can read them, making plain text files the preferred format for configuration files (located in /etc) and even encrypted files that use "plaintext to ciphertext" encoding (e.g., /etc/shadow). The most common command used to read plain text files is cat (short for "concatenate").
用法如下:
Syntax:cat [-otpiton][--option] file
Command name/Function/Command user
Options
Function
cat /
file read /
Any
-A
Same as -vET
-b
Adding Line Numbers to Non-Blank Lines
-e
Same as -vE
-E
Display "LF" (ASCII = 0AHEX) as "$" (Linux newline is displayed as "$")
-n
Add line number
-s
Squeezing Multiple Blank Lines into One
-t
Same as -vT
-T
Horizontal positioning "TAB" (ASCII = 09HEX) is displayed with "^I"
-v
Control characters, except for Line Feed (LF) and "TAB," are displayed as "^", while ASCII characters > 0x7F(HEX) are displayed as "M-"
--help
Displays the command's built-in help and usage information
Before providing practical examples, let's first understand the concept of "control characters" in ASCII (ASCII # 0-31), using Windows' Notepad as an example.
In Notepad, if you input a Tab character (ASCII=09HEX), it will display as eight spaces. Although the visual result is the same as typing eight spaces on the keyboard, the underlying meaning is entirely different. Each application software may interpret ASCII=09 (HEX) differently.
Therefore, control characters in ASCII are primarily used to control output behavior, such as newline, horizontal tab, backspace, etc. They may not necessarily have visible characters displayed on the screen, and different applications may interpret control characters differently.
In most cases, when using the cat command to view file contents, no additional options are needed. The purpose of adding options is usually to understand which characters in the text file are true spaces and which are results of control characters. Another use case is when different platforms or applications store files with "control characters" definitions that may conflict with Linux's tty (terminal) control characters. Adding options allows you to force the display of control characters using special symbols, thus avoiding garbled output resulting from conflicts.
Example:
$ cat /etc/hosts.allow←Read the file /etc/hosts.allow
#
# hosts.allow This file contains access rules which are used to
#
allow or deny connections to network services that
#
either use the tcp_wrappers library or that have been
#
started through a tcp_wrappers-enabled xinetd.
#
#
See 'man 5 hosts_options' and 'man 5 hosts_access'
# for information on rule syntax.
#
See 'man tcpd' for information on tcp_wrappers
#
$ cat -TE /etc/hosts.allow←Display "TAB" (ASCII=09HEX) as "^I" and "LF" (ASCII=0AHEX) as "$"
#$
# hosts.allow^IThis file contains access rules which are used to$
#^I^Iallow or deny connections to network services that$
#^I^Ieither use the tcp_wrappers library or that have been$
#^I^Istarted through a tcp_wrappers-enabled xinetd.$
#$ 以下略
In addition to using the cat command to read text files, there are three other useful commands that can be used in specific scenarios
head: Read the beginning of a file head is used to display the beginning or top portion of a file. By default, it shows the first 10 lines of the file, The advanced usage is as follows.
Syntax:head [-otpiton][--option] file
Command name/Function/Command user
Options
Function
head/
Read the first few lines of the file/
Any
-c[#bkm]
The output is not in units of lines, but in units of bytes. The available options are:
"#":output #l bytes ("#"is a number,if omitted, it represents 1)
"[#] b" b for Block (represents 512 bytes)
"[#]k" k for Ki
"[#]m" m for
Mi
-n#
Only read the first # lines of the file ("#" is a number)
+#
Skip the first # lines ("#" is a number)
--help
Displays the command's built-in help and usage information
例:
$ head text_file←Read the first 10 lines of the file "text_file"
$ head -c50 text_file←read the first 50 bytes of the file
$ head +5 -n20 text_file ←read the file, start reading from the 5th line Read 20 lines
$ head -cb text_file ←read the file "text_file", the first 512 bytes
$ head -c2k text_file ←read the file "text_file", the first 2k byte
tail: Read the end of a file
The tail command is used to read the end or tail of a file. Its usage and options are similar to those of the head command, but tail reads the last few lines of a file by default (usually the last 10 lines).
Only read the last # lines of the file ("#" is a number)
-f
Continue to read the file until the file disappears (press <Ctrl+C> to end)
-F
Read files continuously, even if they disappear (press <Ctrl+C> to end)
--help
Displays the command's built-in help and usage information
例:
$ seq 1 100 | tail -n5 ←uses a pipeline to read the last 5 lines from the output of the seq command
96
97
98
99
100
As mentioned, the tail command is often used in conjunction with pipelines. One particular use case is the tail -f command, which is primarily used for reading continuously growing files, such as log files or files with append redirection as well as FIFO files. tail -f allows you to monitor changes in real-time.
When you use tail -f to read a file, it will continue reading the file until it is deleted or until you manually terminate the command by pressing Ctrl+C.
The main difference between tail -f and tail -F is that tail -F will continue attempting to read the file even if it has been deleted. If the file is recreated after being deleted, tail -F will resume reading it.
This distinction is useful in scenarios where log files or output redirection files are rotated or periodically deleted and recreated. By using tail -F, you can ensure that you continue monitoring the file even if it gets deleted and recreated.
In summary, while tail -f will stop reading a file once it's deleted, tail -F will persistently attempt to read the file, making it useful for cases where the file may be rotated or temporarily removed.
tac: Reverse read
The tac command is used to reverse the order of lines in a file. It is essentially the reverse counterpart of the cat command. It reads the file in a line-by-line manner and displays the lines in reverse order.
Here are a couple of examples to illustrate its usage:
$ seq 1 100 | tail -n5 | tac ← Same as the previous example, but reverse read
100
99
98
97
96
$ tac file.txt←Reverse read file
od: Octal output
The od command, short for "octal dump," is used to display the contents of a file in octal (base-8) format. Unlike cat, which is primarily used for reading text files, od can be used to read and display the contents of non-text files such as executable binaries.
As an octal dump tool, od is particularly useful for programmers and developers who need to analyze binary files, examine file structures, or interpret the data stored in non-text files. It provides a way to view the raw data in a file in octal format, which can be helpful for debugging or understanding the file's content at a low-level.
For most general users, the opportunity to use od may be limited. However, it's good to be aware of its existence and purpose as a powerful tool for developers when working with non-text files or performing low-level analysis.
Syntax::od [-otpiton][--option] file
Command name/Function/Command user
Options
Function
od/
octal output /
Any
-A[doxn]
The way of displaying the leftmost address, the available options are:
"d" is decimal,
"o" is octal,
"x" is hexadecimal,
"n" is not displaying the address
-t[cdfoux][#]
Display format, the available options are:
"c" ASCII character
"d" is decimal
"f" is floating point
"o" is octal "
u" is unsigned decimal
"x" is hexadecimal
"#" is To display several bytes as a group ("#" is a number), the default is 8
-j#
Skip the first # bytes ("#" is a number)
-N#
The number of bytes read ("#" is a number)
-w#
How many bytes are displayed in a column ("#" is a number)
-v
o not omit the same column (by default, if the two columns are the same, only "*" will be displayed for the same column)
--help
Displays the command's built-in help and usage information
The od command has various options to specify the desired output format, such as decimal, hexadecimal, or ASCII representation. This flexibility makes it practical for different use cases. Here are a couple of examples:
Example:
$ od -j50 -N20 -Ad -tx2 /bin/mkdir←reads 20 bytes starting from the 50th byte in the file /bin/mkdir. It displays the addresses in decimal, and the output format is two-byte hexadecimal representation. The output will look something like this:
0000050 ←Address 001f 0006 0000 0034 0000 8034 0804 8034
0000066 0804 0100
0000070
$ od -tc -Ax /etc/hosts.allow←Output in ASCII, address in hexadecimal
000000
# \n #
h o s t s
. a l l o
w \t
000010 T h
i s f
i l e
c o n t a i
000020
n s a
c c e s
s r u
l e s
000030
w h i c
h a r
e u s
e d t . . .
Newline
When editing a document in vi, pressing ↵ Enter actually records a newline character, known as "LF" (ASCII = 0Ahex), to display the following characters on the next line. This "LF" character, also known as "newline" or "line feed," is a control character defined in ASCII for denoting line breaks.
Most software interprets the newline character in ASCII-recorded text files as the end of a line, causing the subsequent text to be displayed on the next line. In Unix/Linux, for the convenience of writing and displaying, "\n" is commonly used to represent the input newline character, while "$" is used to display the newline character (e.g., the commands cat -E or sed -n l display the newline character as "$").
However, not all platforms use a single-byte "LF" to represent a newline. In DOS/Windows, a newline consists of two bytes: "CR" (carriage return) followed by "LF" (line feed).
Therefore, when opening Unix/Linux text files with Windows' Notepad, the format may appear distorted due to the inability to interpret the Linux newline character.
Different platforms use the following newline characters:
Early Apple computers (from APPLE II to Mac OS 9): CR (ASCII = 0DHEX).
Last updated : July 12 2021
Please note that as of Windows 10's Notepad, it can recognize newline characters from Linux and macOS. [Note]
To ensure proper formatting when exchanging text files between different platforms, it is necessary to convert the newline characters. The following are commands for converting newline characters:
unix2dos: UNIX to DOS format unix2dos is a command used to convert Unix newline characters to DOS/Windows newline characters.
The usage of unix2dos is very simple. Here is the usage:
Quiet mode (the conversion process will not be displayed on the screen)
--help
Displays the command's built-in help and usage information
Example:
$ unix2dos -n FileA dos.txt←Convert UNIX format "FileA" to DOS format file "dos.txt"
$ unix2dos FileA←If there is no option, the new file (DOS format) will convert the original file (Linux format) cover
dos2unix: - DOS to UNIX format dos2unix is a command used to convert DOS/Windows formatted text files to Unix/Linux format. Although text files created under DOS do work in Linux, they are not in the standard Unix/Linux format. Additionally, DOS newline characters take up extra space. Therefore, converting them to Unix format can be beneficial.
echo: Display tex
The echo command is used to display text on the screen. It is the simplest command for this purpose, and its basic usage is straightforward. Simply use echo 'string' to display the desired text.
In Linux commands, when dealing with strings, it is recommended to use single quotation marks (') to enclose the string. Although double quotation marks (") or even no quotation marks at all can work, it is important to develop the habit of using the correct syntax. Not using single quotation marks around the string can sometimes lead to unexpected behavior. Additionally, in the BASH shell, double quotation marks (") serve a different purpose.
Here are some examples of using the echo command:
:
$ echo 'Hello World' ←The first and second examples are the most conventional
Hello World
$ echo "Hello World"
Hello World
$ echo Hello World
Hello World
If the string contains single quotation marks ('), you should use double quotation marks (" to enclose the string. Conversely, if the string contains double quotation marks ("), you should use single quotation marks (') to enclose the string.
Here are some examples:
$ echo I'm a student ←Incorrect usage since the (') marks are not paired >Ctrl+C ←Press <Ctrl+C> to stop the current operation or input another single quotation mark to make the quotation marks paired
$ echo "I'm a student" ←Use (") when the string contains single quotation marks
I'm a student
$ echo "I'm Lovin' You"←(') or (") can be nested
I'm Lovin' You
$ echo I saw a "saw"
I saw a saw ←The output looks strange since the (") disappeared; the following example shows the correct usage $ echo 'I saw a "saw" '←It is important to develop the habit of using correct syntax. When dealing with strings, the basic syntax is to use single quotation marks (') to enclose the string.
I saw a "saw"
Understanding the usage of echo as described above should be sufficient for general needs. However, if you want to use echo in more advanced ways, such as to display [I'm a student, I saw a "saw"...] using echo, how would you write it?
Extended display format, the available options are:
\a issue "beep" (ASCII = 07HEX )
\b "backspace" (ASCII = 08 HEX ) ( Backspace key)
\f "page change" (ASCII = 0C HEX ) ( The position of the cursor remains unchanged, but it is displayed on the lower line)
\n"Line feed" (ASCII = 0A HEX ) ( Enter key)
\t"Horizontal positioning" (ASCII = 09 HEX ) ( Tab key)
\x## : ## is ten Hexadecimal ASCII code
\0### :### Octal ASCII code (\0 is the zero )
--help
Displays the command's built-in help and usage information
As can be seen from the above table, any ASCII character can be displayed by directly inputting the ASCII code with echo -e '\x##' .
Example:
$ echo -e 'I\x27m a student, I saw a \x22saw\x22' ←(')ASCII code is 27HEX ,(")ASCII code is 22HEX
I'm a student, I saw a "saw"
Anotheecho $'\x##' = echo -e'\x##'(## is the ASCII code of hexadecimal).
Example:
$ echo $'\x41\x42' ←List ASCII=41(hex) & 42(hex) if char AB
Example: (Understand the advanced usage of echo -e )
$ echo -e Linux is\f a PC OS
Linux isf a PC OS ←Is the output weird? "\f" (horizontal positioning) doesn't work? Sometimes if you don't use single quotation marks (') to enclose the string in pairs, There will be an error
$ echo -e 'Linux is\f a PC OS'←use single quotes (') to enclose the string in pairs and it will be OK
Linux is
a PC OS
$ echo -e 'Linux is\n a PC OS' ←Use newline to use echo to display more than one line of strings
Linux is
a PC OS
$ echo -e 'Linux is\t a PC OS'
Linux is a PC OS
$ echo -e 'Linux is\x9 a PC OS'←Directly input the ASCII code"09HEX" instead of horizontal positioning
Linux is a PC OS
$ echo -e '\xe'←Accidentally use the wrong ASCII control code, it may cause garbled characters!
[▒▒▒@┌⎺␌▒┌⎺⎽├ ·]$ ←When garbled characters are generated, remember to input the reset screen instruction "reset"
more: Paging file viewer (scroll down)
用 cat 指令來閱讀文字檔時,如果此文字檔很大(如 cat /usr/share/dict/linux.words),輸出一閃即過根本來不及閱讀,用翻頁閱讀器 more 或其姊妹指令 less 就可慢慢的來閱讀,指令 more 其用法如下: more is a paging file viewer that allows you to read large text files in a controlled manner. When using the cat command to view a large text file (e.g., cat /usr/share/dict/linux.words), the output might scroll past too quickly to read. In such cases, using a pager like more or its sibling command less allows you to read the content at your own pace. Here is the basic usage of the more command:
語法:more [-otpiton][+ option][+/ option] file
Command name/Function/Command user
Options
Function
more/
paging file viewer /
Any
-#
"#" is a number, representing the number of columns to be displayed on the screen
+#
"#" is a number, representing the output from the first line
+/<string>
Search for a string in an archive and output from there
進入 more 翻頁閱讀器後的操控如下:(其操作和 vi 很類似)
Once you are in the more pager, you can use the following commands to navigate through the content (similar to the commands in vi):
Q or q: Quit more and return to the shell.
H or h: Displays the built-in help or manual.
↵ Ente: Scroll down by one line.
Space: Scroll down by one page (or screenful).
=: Display the current line number.
/string: Search for the specified string downwards.
n: Repeat the previous search (/string) in the forward direction.
!<COMMAND>: Execute a Linux command while in more.
例:
$ more +3 /etc/services ←Start reading the file "/etc/services" from the third line
# Network services, Internet style
#
# Note that it is presently the policy of IANA to assign a single well-known
# port number for both TCP and UDP; hence, most entries here have two entries
. . .
tcpmux
1/udp
# TCP port service multiplexer
--More--(0%) ←The current number of pages accounts for the percentage of the entire file
less: Paging file viewer (scroll up/down) less is a paging file viewer that provides the capability to scroll both up and down through a text file. It is an improved version of more that offers more convenient navigation options. When using less, you can use the following keys to scroll through the content:
Home or End: Jump to the beginning or end of the file.
Page Up or Page Down: Scroll up or down by one page.
↑or ↓ arrow keys: Scroll up or down by one line at a time.
Here are examples of using less to read a file:
Example:
$ less /usr/share/dict/linux.words
$ cat /usr/share/dict/linux.words | less ← This command achieves the same result as the previous example
Please note that less provides more advanced features and functionality compared to more. If you're interested, you can press H or h while running less to access the help page and learn more about its operations and available commands.
Overall, less offers a more flexible and powerful way to navigate and read through large text files compared to more.