ENG⇒中ENG⇒中 1.0 RAID - Redundant Array of Inexpensive Disksy
RAID stands for Redundant Array of Inexpensive Disks or Redundant Array of Independent Disks. The term "Redundant" in the dictionary denotes something excessive or superfluous. However, in the context of RAID, it serves the purpose of backup and fault tolerance. This means that different combinations of redundant hard drives are used to achieve functions such as backup, fault tolerance, and even acceleration. The merging of multiple hard drives into a single virtual device is referred to as RAID.
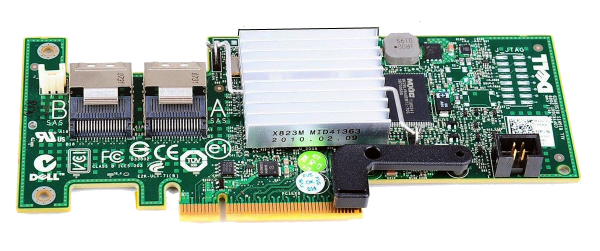
RAID can be categorized based on its functions, including acceleration, increased capacity, backup, or fault tolerance. Different RAID levels can be configured to meet various needs. The formation of these different RAID levels can be achieved using hardware, known as Hardware RAID. It can also be accomplished using software, known as Software RAID. There is also a hybrid option called Semi-Hardware RAID, which combines aspects of both hardware and software. The advantages and disadvantages of each approach are as follows:
Operating system independent (Generally, only the RAID controller card's driver needs to be installed in the OS, and the rest of the RAID operations are handled by the RAID controller card).
Faster speed.
Higher data security; the RAID configuration remains unaffected by OS failures or sudden power loss. Advanced RAID controller cards often have backup batteries to maintain power for caching data to the drives.
Easy operation and maintenance (Usually equipped with LEDs/LCDs to monitor drive status).
RAID can be bootable.
Disadvantages:
Expensive, with prices varying from a few thousand Taiwanese dollars to tens of thousands, depending on the brand and RAID level support.
If the RAID controller card fails, replacing it with a different model does not guarantee recognition of the previous RAID data. It's recommended to use reputable server-grade RAID controller cards for better reliability (Server-grade cards often offer parts availability for more than 5 years).
Software RAID:
In Software RAID, also known as Soft-RAID, all RAID operations are processed by the CPU. Advantages:
Cost-free.
High flexibility, allowing free configuration of RAID levels and parameters. Any storage media, such as USB drives, IDE, SATA, SAS, M.2 drives, or even partitions, can be combined to create a RAID.
No concerns about hardware RAID controller card compatibility or obsolescence.
Disadvantages:
Cannot be used for booting except for RAID 1. Other RAID levels require the OS to fully boot before RAID calculations can be performed.
Slower speed compared to Hardware RAID, especially when operating in RAID 5/6 with a heavy OS load.
Strong dependence on the operating system; for example, a Soft RAID created in Linux may not be compatible with a Soft RAID created in Windows.
Semi-Hardware RAID
Some motherboards lack dedicated RAID controller chips, but their BIOS includes an option to enable RAID functionality. This type of RAID, which is provided for free, is referred to as "Semi-Hardware RAID" or "BIOS-RAID." A typical example of BIOS-RAID is the Intel ICHxR series southbridge chipset. However, there's no such thing as a free lunch, and in reality, "Semi-Hardware RAID" is 99% Software RAID. The BIOS tricks the operating system into thinking it's a RAID controller, but the required computations for RAID are carried out by the CPU, making it essentially a form of Software RAID.
In practice, its speed is not faster than Software RAID, and it lacks the flexibility of Software RAID, making it a substantial deception. Therefore, it's also referred to as "FakeRAID," and it's generally advisable to avoid it. Its only advantage is its lower dependence on the operating system compared to Software RAID, as certain chipsets supporting Semi-Hardware RAID are compatible with both Windows and Linux.
Choosing RAID Hard Drives
Many people might think that RAID already provides basic backup and fault tolerance capabilities, so they choose cheap hard drives. While this might be acceptable for practice purposes, when deploying RAID for professional use, there are several important considerations when selecting hard drives. First and foremost, you need to consider the hard drive's error correction mechanism.
In general, when a regular hard drive detects instability in a certain magnetic area during operation, it will "freeze" momentarily and secretly move the data from the unstable area to a reserved area. After the transfer is complete, the unstable area is blocked, and the reserved area is opened up. As a result, the total capacity remains unchanged (referred to as "deep recovery cycle" in Western Digital's terminology). Through this process, the hard drive effectively performs a "Grand Relocation" of data, which might appear as a momentary pause to the average user, causing minimal disruption.
However, both Hardware RAID and Software RAID treat any hard drive that doesn't respond within 8 to 30 seconds during data writing as a faulty drive and eject it from the RAID array. While the "deep recovery cycle" doesn't happen frequently, in applications that operate 24/7 for a year, it is likely to occur a few times. This behavior is not limited to mechanical hard drives; even SSDs (Solid-State Drives) with their limited write-cycle lifespan due to NAND Flash rely on this type of self-repair mechanism.
Taking Western Digital's consumer-grade desktop hard drives (Blue, Green, Black series) as an example, the "freeze" during the execution of the "deep recovery cycle" can last up to 2 minutes. If this happens in a RAID setup, the hard drive would have been already ejected from the RAID array due to the extended response time. However, Western Digital's enterprise-grade hard drive series (such as Velociraptor and RAID Edition Re) are equipped with "TLER" (Time-Limited Error Recovery) functionality, which ensures that the "freeze" during error correction won't exceed 7 seconds, preventing the drive from being kicked out of the RAID array.[Note 1.0]
Not only Western Digital, but other brands of enterprise-grade hard drives like Seagate, Toshiba, and Hitachi also have similar mechanisms, though the terms used might differ (such as ERC - Error Recovery Control or CCTL - Command Completion Time Limit). Therefore, when setting up a RAID, it's crucial to spend some time checking the specifications on the hard drive manufacturer's website. If you're setting up a RAID 5, you should also consider "URE" (Unrecoverable Read Errors) and aim to minimize potential RAID 5 unrecoverable errors. It's not just about price and capacity; otherwise, you might end up with unexpected issues.
In general, hard drives suitable for setting up RAID are of "enterprise-grade" or "NAS-grade", which offer support for "TLER" (Time-Limited Error Recovery) functionality and lower levels of "unrecoverable read error."
RAID-Levles
Different numbers of hard drives or partitions can be organized into various RAID levels based on their functions, achieving functionalities such as acceleration, increased capacity, backup, or fault tolerance. Furthermore, the addition of more hard drives can result in hybrid RAID configurations that combine multiple functionalities, such as acceleration + fault tolerance or increased capacity + backup. Cheaper hardware RAID or Fake RAID solutions may have limited support for certain RAID levels. While standard RAID levels range from RAID 0 to RAID 6, RAID 2 to RAID 4 are theoretically viable but not practical in real-world scenarios and are rarely commercially implemented, so they are omitted from discussion.
RAID 0 (stripe)
Requires a minimum of two hard drives. More than two hard drives are combined to create a larger virtual disk. During read/write operations, files are divided into segments and read/written in parallel on different hard drives (hence the term "stripe"). RAID 0 offers the highest speed and capacity but is also the riskiest, as the failure of a single hard drive can lead to the loss of all data. Essentially, RAID 0 operates on the same principle as LVM's Stripe Volume. Therefore, the capacity of RAID 0 is calculated as "capacity of the smallest hard drive x number of hard drives."
The primary objectives of RAID 0 are increased capacity and speed, with no backup or fault tolerance functionality.
RAID 1 (mirror)
In the past, one of my supervisors used to travel with his entire family, but they always took separate flights with at least two planes. I was curious and asked why. His reasoning was quite unique and practical: "The person responsible for causing a car accident might not have enough money to compensate you, but in the case of a plane crash, the airline would definitely compensate, and the amount could be astronomical. If the entire family is on the same plane and it crashes, who will receive the compensation? There needs to be at least one survivor to claim it." Similarly, RAID 1 works on a similar principle of risk diversification—having at least one survivor. RAID 1 consists of a minimum of two hard drives, with multiple hard drives mirroring each other (hence the term "mirror"). The content on these drives is identical, so even if one hard drive fails, the data can still be read/written from the other.
RAID 1 operates on the same principle as LVM's Mirror Volume. Regardless of the number of hard drives, RAID 1 capacity is determined by the "capacity of the smallest hard drive."
The primary objective of RAID 1 is data backup and fault tolerance, making it the most secure option. It offers some acceleration benefits (read speed is determined by the fastest hard drive, while write speed waits for the slowest drive).
RAID degraded:
RAID levels with fault tolerance, such as RAID 1/5/6, can continue to function if one hard drive fails (RAID 6 can handle two simultaneous failures). However, the RAID operates in a degraded mode in this situation. If another hard drive fails while the RAID is in this state, the entire RAID array could be compromised. It's advisable to promptly replace the faulty hard drive or keep a spare disk available.
Spare-Disk :
To prevent RAID from downgrading due to disk failure, you can add one or more "spare disks" to RAID configurations with fault tolerance. The spare disk remains inactive during regular operation, but if the RAID is degraded, the spare disk will automatically join the array, replacing the failed disk and reconstructing the RAID without manual intervention. This is often referred to as a "hot spare disk" since it facilitates automatic replacement.
The process of rebuilding the entire RAID could take several hours (depending on RAID size and disk speed). During this time, the RAID remains in degraded mode. However, once the rebuilding process is complete, the RAID array is restored to full functionality.
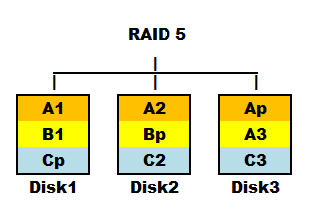
RAID 5
Consisting of a minimum of three hard drives, RAID 5 represents a balanced compromise between RAID 0 and RAID 1.
The principle of RAID 5 involves splitting a data set among various hard drives, as shown in the diagram. Each hard drive is accompanied by a parity bit, contributing to the fault-tolerant mechanism. In the event of a hard drive failure, the remaining drives can use the parity information to reconstruct the data and continue operation. If a spare disk is available or the faulty hard drive is replaced, the presence of parity information on the remaining drives facilitates the reconstruction of the entire RAID 5 array.
The capacity of RAID 5 is calculated as "(number of hard drives - 1) x capacity of the smallest hard drive."
RAID 5 offers fault tolerance, acceleration, and backup functionalities while requiring a relatively modest number of hard drives. It used to be a dream combination, but with the increasing capacity of modern hard drives, a new concern has arisen—Unrecoverable Errors (URE).
Unrecoverable Errors in RAID 5
Online, you may often come across reports of RAID 5 arrays collapsing during the replacement and rebuilding of new hard drives, resulting in data loss. This has led to suspicion regarding the RAID 5 algorithm. However, the root cause is not RAID 5 itself but rather the hard drives' specification called "URE" (Unrecoverable Read Error).
URE, short for Unrecoverable Read Error, is an essential specification of a hard drive. For consumer-grade hard drives, the acceptable rate of read errors is 1 in 1014 bits (URE = 1/1014). Enterprise-grade hard drives typically have URE rates of 1 in 1015 (URE = 1/1015 ).
While URE rates of 1/10-14 or 1/10-15 might seem low and negligible on the surface, the issue becomes amplified when used in a RAID 5 configuration. Nowadays (as of 2014), hard drives often start at 1TB (1T = 1012), making the occurrence of a single bit error after reading a full 1TB drive more significant. Moreover, during the reconstruction of RAID 5, which involves reading/writing at least three hard drives, any bit read/write error can render RAID 5 unable to recover the data.
Based on calculations, the worst-case rebuild failure rate for a 2TB RAID 5 array composed of 6 hard drives is as follows:
URE
RAID 5 of rebuild failure rate
for 6x 2TB drives (total 12 T)
From the table above, it's evident that the importance of using enterprise-grade or NAS-grade hard drives with lower "unrecoverable read error" (URE) rates is highlighted when configuring RAID 5.
RAID 6
Consisting of a minimum of four hard drives, RAID 6 can be seen as an enhanced version of RAID 5. It employs two independent and distinct algorithms for parity, increasing reliability and allowing for the operation and recovery even in the presence of up to two simultaneous hard drive failures.
Due to the simultaneous writing of two independent parity blocks, the write efficiency of RAID 6 is lower than RAID 5, and it is relatively more complex. This aspect was not given much attention in the past, but with the inevitable trend of increasing hard drive capacities, it has gained renewed importance. As the capacities of hard drives continue to grow, the phenomenon of RAID 5's unrecoverable read errors becomes amplified, prompting a resurgence of interest in RAID 6.
The capacity of RAID 6 is calculated as "(number of hard drives - 2) x capacity of the smallest hard drive."
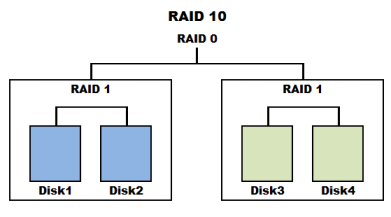
Hybrid RAID (or Nested RAID)
Different RAID levels can be combined into a hybrid RAID (Hybrid-RAID or Nested-RAID), for example, RAID 10 (or RAID 1+0), which combines RAID 1 followed by RAID 0. This configuration allows for both the speed and capacity advantages of RAID 0 and the data security of RAID 1, as shown in the diagram below.
As long as there are enough hard drives, theoretically, various RAID levels can be combined in hybrid configurations. However, in the case of RAID 1 and RAID 0, you can create RAID 01 or RAID 10. RAID 01, though possible, has lower reliability (consider the combination yourself), so some hybrid RAID setups are not very common. More practical hybrid options include RAID 10, RAID 50, and RAID 60.
However, with the increased functionality of hybrid RAID comes the challenge of choosing the right configuration. A general recommendation is to opt for RAID 5 or RAID 6 if there is a higher emphasis on reading operations. On the other hand, if frequent random write operations are involved, RAID 10 would be a better choice.
1.1 Linux Soft RAID
Although Software RAID offers convenient and quick management without the need for hardware RAID, it will never disappear due to its "cost-free" nature. Another advantage is its flexibility, allowing for the free combination of different RAID levels and the utilization of partitions to create RAID arrays or even complex assemblages. For example, it is possible to create a RAID using a mix of hard drives with various interfaces such as IDE, SATA, SCSI, USB, M.2 etc. This is something that Hardware RAID cannot achieve. Furthermore, some entry-level hardware RAID controllers might only support limited RAID levels. For instance, Dell's entry-level RAID Controller (PERC) H200 only supports RAID 0, RAID 1, and RAID 10. However, it's worth mentioning that running RAID 0, RAID 1, and RAID 10 using Software RAID doesn't necessarily result in slower performance compared to Hardware RAID, as RAID 0 and RAID 1 fundamentally involve minimal computational overhead.
mdadm - Creating/Managing Software RAID
The commandmdadm stands for "multiple disk devices admin" and is an abbreviation used for creating, managing, and monitoring Software RAID on Linux systems. The terms "md" (multiple disk devices) and "dm" (in /dev/mapper/) like in LVM or kpartx, both refer to virtual storage devices.
mdadm is a versatile command used for creating, managing, and monitoring Software RAID. For detailed usage instructions, you can refer to the man mdadm command. Below, I'll introduce the commonly used modes: create、manage、assemble 、monitor、grow, and misc.
Create Mode, Establishing Software RAID mdadm – create md-DEVICE is used to establish Soft-RAID mode. After creating the "md" (multiple disk) device, remember to edit "/etc/mdadm.conf". Soft-RAID is now complete. You can use the md device as a partition of a hard disk after formatting it and then mounting it and modifying "/etc/fstab".
The basic usage of mdadm is as follows:
mdadm
--create
/dev/md#
--level=(#|NAME)
--raid-devices=#
DEVICE
[--spare-devices=# DEVICE]
↑
↑
↑
↑
↑
↑
(1)
(2)
(3)
(4)
(5)
(6)
Here are the explanations for each option and parameter:
〝--create〞or〝-C〞
Create a new Software-RAID.
/dev/md#
Assign an ID to md (multiple disk devices, also known as RAID devices), which can be from md0~md31 or md99, depending on the distribution.
〝--level=#〞or〝-l=#〞
Where "#" is a number specifying the desired RAID level for operation. Soft-RAID supports several RAID levels, including "linear," and 0/1/4/5/6. Here are brief introductions for each:
--level=linear
This is a non-standard RAID level, composed of two or more disks or partitions. Its purpose is solely to increase capacity without providing any acceleration. In a Linear RAID, data is written to one disk until it is full before moving on to the next disk. However, if any one disk (or partition) fails, the entire RAID becomes inaccessible.
--level=stripe 或 level=0 RAID 0 is formed by combining two or more disks or partitions.
--level=mirror 或 level=1 RAID 1 is formed by combining two or more disks or partitions.
--level=[456]
The usage of "--level=[456]" is quite similar for all three RAID levels, where RAID 4 and RAID 5 require a minimum of 3 disks (or partitions), while RAID 6 requires at least 4 disks. The following example demonstrates creating a RAID 5 configuration:
Example: mdadm /dev/md2 --create --level=5 --raid-devices=3 /dev/sdb /dev/sdc /dev/sdd.
〝--raid-devices=#〞or〝-n=#〞
Where "#" is a number indicating the count of disks (or partitions) required to form the RAID array, excluding spare disks.
〝DEVICE〞
The term "DEVICE" refers to the list of disks or partitions required to compose a RAID array. One of the flexible aspects of RAID, compared to Hardware-RAID, is that RAID arrays can also be created using partitions.
For example: mdadm --create /dev/md1 --level=mirror --raid-devices=2 /dev/sdb /dev/sdc2.
In the above example, the RAID 1 array is composed of the disk /"dev/sdb" and the partition "/dev/sdc2". It's important to note that when creating a RAID array using partitions (like "/dev/sdc2") or entire disks ("like /dev/sdb"), the existing data on those partitions or disks will be lost and overwritten. Therefore, it's recommended to back up any important data before creating a RAID array. Additionally, after creating the RAID array, the partition type of the disks might change to "loop," which can be observed using the parted -l command.
〝--spare-devices=# DEVICE〞or〝-x=# DEVICE〞
This is an optional parameter used to specify the number of spare disks (or partitions) in the RAID configuration. It can be used with all RAID levels except" --level=linear" or "--level=0"(raid 0), as these levels do not have fault tolerance capabilities. The spare devices are not part of the active array but serve as replacements in case of a disk failure. This option is generally added at the end of the mdadm command.
Editing RAID Configuration File /etc/mdadm.conf
After configuring a Soft-RAID using mdadm, editing the "/etc/mdadm.conf" file allows the system to automatically start the previously established RAID during the next boot. While some Linux distributions can start the RAID on reboot based on data from the superblock without needing this configuration file, the "assemble" mode (--assemble) might still be useful, hence it is recommended to edit the "/etc/mdadm.conf" file.
There are two crucial pieces of information recorded in "/etc/mdadm.conf". The first is the list of devices ("DEVICE") that comprise the RAID, and the second is the "UUID" of the RAID. The second item can be generated using the Misc mode with the command mdadm --detail --scan. The following example illustrates creating a RAID 1 and editing the "/etc/mdadm.conf" file:
Example:
# mdadm --create /dev/md0 --level=1 --raid-devices=2 /dev/sdb /dev/sdc --spare-devices=1 /dev/sda6←# Create a RAID 1 array with two devices, "/dev/sdb" and "/dev/sdc", and designate "/dev/sda6" as a spare disk.
mdadm: largest drive (/dev/sda6) exceed size (3767808K) by more than 1%
Continue creating array? y←Such as hard disk or partition There will be a warning if the size is different or there is data in it, press <y> to continue
mdadm: array /dev/md0 started. ←md (RAID)started
# echo 'DEVICE /dev/sdb /dev/sdc /dev/sda6' > /etc/mdadm.conf ← Write the Device of the RAID group into "/etc/mdadm.conf" (to include spare-device)
# mdadm --detail --scan >> /etc/mdadm.conf←Write the UUID of the RAID Add "/etc/mdadm.conf"
# cat /etc/mdadm.conf←Confirm the content of the file "/etc/mdadm.conf"
DEVICE /dev/sdb /dev/sdc
ARRAY /dev/md0 level=raid1 num-devices=2 spares=1 UUID=0fcf1a50:057f9442:49ee75e2:9acafdb6
The advanced settings in "/etc/mdadm.conf" include "MAILADDR", which can be used to send an email notification when there is a problem with the RAID array, and "PROGRAM", which can be used to run a specific command when mdadm detects a specific condition. For more information, please refer to the man page for "mdadm.conf" and the monitor mode.
After creating the Soft-RAID array, you can format and mount the array and edit the "/etc/fstab fil"e. The following example shows how to do this.
Example:
# mkfs -j /dev/md0←format
# mount /dev/md0 /medial←mount
Monitoring Soft RAID in /proc/mdstat
"/proc/mdstat" is a useful tool for monitoring the status of a RAID. In the example above, a RAID 1 is created using mdadm, and the output of "/proc/mdstat" is observed as follows:
Example:
# cat -n /proc/mdstat←Monitor RAID status
1 Personalities : [raid1] ←Current raid levels
2 md0 : active raid1 sda6[2](S) sdc[1] sdb[0]←RAID disk combination (S indicates spare device)
3 3767808 blocks [2/2] [UU]←RAID operational status
4 [=>...................] resync = 5.1% (194752/3767808) finish=11.5min speed=5154K/sec ←Display sync percentage and estimated completion time
The second line indicates whether the RAID is "active" or "inactive," with "(S)" representing a spare disk. If "(F)" is present, it indicates a faulty disk.
The third line displays "[2/2][UU]," representing the number of disks (or partitions) and their operational status. For example, in RAID 5, if it shows [3/2][_UU], the RAID is degraded, with only two out of three disks functioning properly.
The fourth line displays the synchronization percentage and estimated completion time. The sync completion time depends on the RAID size and disk speed, ranging from minutes to hours. However, you don't necessarily have to wait for synchronization to complete before performing subsequent operations (like formatting). This shows the progress of mirroring and copying between the two disks in RAID 1 (RAID 5/6 shows the progress of RAID creation). If data is written to the RAID before synchronization is complete, and if one disk fails during this time, the data in the RAID may become unreadable.
Additionally, you can monitor RAID status using the miscellaneous mode mdadm --detail md-DEVICE ,as shown in the example below:
Example:
# mdadm --detail /dev/md0
/dev/md0:
Version : 00.90.03
Creation Time : Wed Aug 21 11:07:44 2013
Raid Level : raid1
Array Size : 3767808 (3.59 GiB 3.86 GB)
Used Dev Size : 3767808 (3.59 GiB 3.86 GB)
Raid Devices : 2
Total Devices : 3
Preferred Minor : 0
Persistence : Superblock is persistent
Update Time : Wed Aug 21 11:07:44 2013
State : active, resyncing
Active Devices : 2
Working Devices : 3
Failed Devices : 0
Spare Devices : 1
Number Major Minor RaidDevice State
0 8 16 0 active sync /dev/sdb
1 8 32 1 active sync /dev/sdc
2 8 6 - spare /dev/sda6
In the example above, the "UUID" should match the UUID in the "/etc/mdadm.conf" file.
Manage Mode, Managing Software RAID
In the management mode for Software-RAID, mdadm --manage md-DEVICE is primarily used for tasks such as adding/removing spare disks or removing failed hard drives. The main operations are as follows:
--add or -a
This operation adds a spare disk to the RAID. If a spare disk wasn't initially reserved during RAID creation, it can be added later. Here's an example:
For RAID1/5/6, if no spare disk was reserved beforehand and a spare disk is immediately added when a hard drive fails and degrades, the RAID will automatically start rebuilding.
The "--manage" option can usually be omitted, so the above example can be simplified to: mdadm /dev/md0 --add /dev/sda6. After adding the spare disk, remember to edit the "DEVICE" section in "/etc/mdadm.conf". Otherwise, the spare disk might not function correctly after a reboot.
--re-add
This operation re-adds a spare disk. If a spare disk was previously removed, you can use the "--re-add" option to add it back. Alternatively, you can use the "--add" option to add the spare disk, but if it disappears after a reboot, try using "--re-add" (after reboot, use mdadm --detail md-DEVICE to check for the presence of the spare disk).
--remove 或 -r
This operation removes a spare disk or a failed hard drive from the RAID array.
--fail 或 -f
This option simulates a failed hard disk. It is mainly used to simulate a hard disk failure in a RAID array. This allows you to practice how to handle a hard disk failure or to remove a hard disk from an active RAID array by setting it to failed first.
The following example shows how to simulate the failure of a hard disk in a RAID 1 array that was created in create mode.
Example:
# mdadm /dev/md0 --fail /dev/sdc←Simulate "/dev/sdc" failure
mdadm: set /dev/sdc faulty in /dev/md0
# mdadm --detail /dev/md0←Observe whether the RIAD is rebuilt . . .
Rebuild Status : 8% complete ←Rebuild progress
UUID : 0fcf1a50:057f9442:49ee75e2:9acafdb6
Events : 0.56
Number Major Minor RaidDevice State
0 8 16 0 active sync /dev/sdb
1 8 6 1 spare rebuilding /dev/sda6 ↑spare-dsik is automatically added to rebuild RAID
2 8 8 32 faulty spare /dev/sdac ↑"/dev/sdc" is marked as faulty
# cat /proc/mdstat←Monitor RAID status
Personalities : [raid1]
md0 : active raid1 sda6[2] sdb[0]sdc[1](F)←(F) means faulty broken
3767808 blocks [2/1] [U_] ←one of the two hard drives in RAID1 is broken
[===>................] resync = 18.1% (6874224/3767808) finish=4.5 min speed=12572K/sec ←Display the syn. completion progress and time
# mdadm /dev/md0 --remove /dev/sdc←Remove the faulty hard disk
mdadm: hot removed /dev/sdc
This test shows the benefits of RAID fault tolerance and the use of a spare disk. If a hard disk fails in a RAID 1/5/6 array, the spare disk will be automatically added. If the hard disk controller supports hot-swap, you can remove and replace the failed hard disk without shutting down the system. If you are not sure, you should always shut down the system before removing or replacing a hard disk, otherwise the hardware may be damaged.[Note1.1]
The mdadm /dev/md0 --fail /dev/sdc --remove /dev/sdc command can be used to combine the "--fai"l and "--remove options".
Since the original spare disk will replace the failed hard disk in a RAID array, it is best to add another spare disk as a backup. If the device name of the additional spare disk changes, remember to update the "/etc/mdadm.conf" file.
Assemble Mode, Restarting Previously Created RAID
If you want to stop the RAID, you can use the mdadm --stop command in the miscellaneous mode. To restart it, you can use the mdadm --assemble or mdadm -A command in the assemble mode.
Example:
# umount /dev/md1←Unmount the RAID on the md-device
# mdadm /dev/md1 --stop /dev/md1←←Stop the md-device
mdadm: stopped /dev/md1
# mdadm --assemble /dev/md1←Restart the md-device
mdadm: /dev/md0 has been started with 3 drivers and 1 spare.
If you want to restart many RAIDs, you can use the mdadm --assemble --scan command in the unspecified mode. This will scan "/etc/mdadm.conf" for all RAIDs and restart them one by one
Monitor Mode, Monitoring Software RAID
The mdadm --monitor command will put mdadm into monitor mode. When Soft-RAID has an abnormality, it will send an email notification or execute some necessary programs (such as backup or repair). Many actions in monitor mode can also be set in" /etc/mdadm.conf".
Monitor mode is generally used with the --daemonize or --daemonise option to let it monitor in the background.
The following are the commonly used monitor mode options:
--mail or -m
Set the notification email.
Example:
# mdadm --monitor --scan --daemonize --mail=abc@123.com←Send email notifications when any RAID has an abnormality.
# mdadm --monitor /dev/md2 --daemonize --mail=123@abc.com←Send email notifications only when "/etc/md2" has an abnormality
--program or -p
Execute some necessary programs.
--syslog or -y
Set all events to be logged in syslog.
--test or -t
Run a test to verify whether email notifications or necessary programs can be executed correctly.
Grow Mode, Changing RAID Size
If the constituent disks of a RAID have been replaced, for example, in a RAID 1 configuration where both disks have been replaced with different capacities, the RAID size can be modified using mdadm --grow or mdadm -G.
Miscellaneous Mode
The Miscellaneous mode is primarily used for querying and performing thorough cleanup of RAIDs. Important options are as follows:
--query or -Q
Queries the md-device.
--detail or -D Displays detailed information about one or more md-devices.
Example:
# mdadm --detail /dev/md0←Display detailed information about md0
# mdadm --detail --scan←Scan all md-devices
--examine or -E
Checks if a hard disk or partition has RAID metadata.
Example:
# mdadm --examine /dev/sdb←Check if /dev/sdb has RAID metadata
--stop
Stops the RAID.
--zero-superblock
Clears all RAID metadata or superblocks from a hard disk or partition.
Sometimes, when creating a RAID using mdadm --create md-DEVICE, if previous RAID metadata exists on a hard disk or partition, you can try using mdadm --zero-superblock DEVICE to completely clear the metadata from the disk before retrying.
To thoroughly remove a RAID, you can take the following steps:
# umount /dev/md3←Unmount first
# mdadm /dev/md0 --stop /dev/md3←Stop themd
# mdadm --zero-superblock /dev/sda /dev/sdb /dev/sdc←Clear information from all disks in the md assembly
# rm /etc/mdadm.conf←Delete the configuration file
Unspecified mode
The unspecified mode has the following main options:
--scan or -S
This option scans "/etc/mdadm.conf" for settings to use as a reference.
For example:
# mdadm --assemble --scan←Scan `/etc/mdadm.conf` and restart RAID
# mdadm --detail --scan ←Scan all md-devices
--brief or -b
Displays shorter information than "--verbose".
--quit or -q
Quiet mode, mdadm will not output anything unless there is an important message.
Creating Hybrid RAID Using mdadm
Common and useful hybrid RAID configurations include RAID 10, RAID 50, and RAID 60. Some distributions support a shorthand notation like --level=10 for RAID 10. For instance, the following command creates a RAID 10 configuration:
While the above approach is convenient, it might not be clear which disk serves as the stripe and which acts as the mirror. Therefore, it's recommended to build step by step. For instance, creating a RAID 50 involves first building two RAID 5 arrays, and then combining these RAID 5 arrays into a RAID 0 array, resulting in RAID 50.
Example:
# mdadm --create /dev/md0 --raid-devices=3 --level=5 /dev/sdb1 /dev/sdc1 /dev/sdd1 ↑ First, create a RAID 5 array
# mdadm --create /dev/md1 --raid-devices=3 --level=5 /dev/sde1 /dev/sdf1 /dev/sdg1 ↑ Create another RAID 5 array
# mdadm --create /dev/md3 --raid-devices=2 --level=0 /dev/md0 /dev/md1 ↑ Combine the two RAID 5 arrays into a RAID 0 array, creating RAID 50
In this approach, you build the RAID configuration in layers, starting from the basic RAID levels and combining them as needed to achieve the desired hybrid RAID configuration
[Note 1.1] Hard drives with IDE interfaces do not support hot-plugging. Hard drives with SCSI/SAS/SATA/eSATA/USB interfaces may support hot-plugging, but the support depends on the hardware's documentation.